Monday, December 29, 2014

c7000 - PORT MAPPINGS

Good day! All,

Welcome back.. the other day someone asked me how the port mappings of Nic's and Interconnect modules work for a Half-height and Full-height blades i showed them 2 screen shots i always carry around..


  • Half-height server blades typically will have 2 embedded Gigabit NICs and two c-Class PCIe mezzanine option connectors. A half-hright server configured with one dual-port Gigabit NIC mezzanine card and one quad-port NIC mezzanine card provides eight independent NICs
  • Full-height server blades typically have four embedded Gigabit NICs and three c-Class PCIe mezzanine option connectors. A full-height server configured with three quad-port Gigabit NIC mezzanine cards provides 16 independent Gigabit NICs
Half-Height Server:


Full-Height Server:

i know i am just sharing little bit of so much around Blades and enclosures and i think HP has very good guides up there explaining more on the same..

Hope this helps someone!!!

Tuesday, December 23, 2014

c7000/c3000 Enclosures - VIRTUAL CONNECT INTERCONNECT MODULES FIRMWARE UPDATE

Good day! All,

Welcome back!, Today i will share with you all the steps we followed to update Firmware for Virtual Connects on either c7000 or c3000 Enclosures.

Before you think of updating Firmware its very much necessary that you take a backup for the Virtual Connect domain


We have 2 ways to accomplish the task

1. Using HP Support pack(HP SPP)
2.Virtual Connect Support Utility - (vcsu-1.9.0)

Assumption is that you are having 2 Virtual Connect Interconnect Modules in bay 1 and bay 2 for redundancy... If not the case then you are looking at lot of downtime because this Firmware updates on each Interconnect Module takes about 20-25 approximately .

So the next question would be how much of downtime is required if we have 2 Interconnect Modules and using VCSU Utility, well i did updates for close to like 20 Enclosures and we always saw like 5-10 Pings packs drops.The beauty with VCSU utility is that it first finishes the standby Interconnect Module and then it fails-over and when doing Active Interconnect Module we have seen the packet drops.

Option 1: Using HP SPP i already posted a article on how to apply Firmware for a Windows Server, the steps are the same just that while Adding Node you type in the IP Address of the Virtual IP of Interconnect Module and chose the right type as below.
If anyone has a question did we ever update Firmware using the HP SPP then the answer is yes only 1 time for like 20 Enclosures and believe me that is not fun at all.. After you hit enter and say re-mediate then you are like watching the browser with no update and no proper information, hopefully in near future this may change but till i writing this article the safe bet would be using VCSU utility..

Option 2: Virtual Connect Support utility

1. Just search the HP site and download the latest Virtual Connect Support utility , the version we used was 1.9 , its just next next and you should be able to install the tool
2. On the desktop you will see shortcut, if not just browse to this location C:\Program Files\Hewlett-Packard Company\Virtual Connect Support Utility and right click on VCSU-CommandPrompt and say create a short cut on the desktop.
3. Go out to HP site and download the Firmware for interconnect modules, usually a BIN file.
4.Click the VCSU-CMD and then type the following command

vcsu -a healthcheck -i IP Address of OA -u Username of OA -p Password of OA -vcu Username of VirtualConnect Manger -vcp Password of Virtual connect Manager

ex. vcsu -a healthcheck -i 192.168.1.1 -u localadmin -p password -vcu Administrator -vcp password


Before you proceed to update the firmware make sure the health check result is all passed, if not re-mediate it first and then only proceed further.

5. Now type the following command to update the firmware..

vcsu -a healthcheck -i 192.168.1.1 -u localadmin -p password -vcu Administrator -vcp password -l "Bin file you just downloaded"

You will prompted with yes/no option to proceed, just type yes..

Lesson we learnt is that after clicking yes it goes fast with Percentage and around like 20 %  for like 15-20 mints it just stops so just be patient and don't close the window.. this is when we have seen that  it does the Firmware update on the stand by Module and then  fail-overs to Active module and if you have started any continues Pings you will see the packet drops now..
After like 40-45 mints if everything goes well you will see something like this..


Well updating Firmware on Interconnect modules are not that cumbersome but certainly needs some planning and if there is critical applications which cant even with stand 5-10 ping drops then you need to be very careful.. Also on a Unix Server we lost nic connectivity and had to be rebooted to have it fixed.. i know this is weird so just play safe when taking downtime always unexpected happens so if we do the maths out of 20 Enclosures we did Firmware update of which we had 320 Blades(20*16 blades) 1 such incident, you do the percentage.

Hope this helps someone!!!
.


(OA)On-Board Administrator on C7000/C3000 - FIRMWARE UPDATE

Good day!All,

Welcome Back! Today i will share with you all the steps we followed to updated OA for c7000/c3000.

Basically there are couple of ways to accomplish the task

1. Using HP SPP , pointing to Active OA IP and re-mediating it
2. Manual download of bin file and updating it..

Before you even start thinking for updating Firmware always safe to take a backup, so login to Active OA using the IP address and on the left hand side expand Enclosure Settings, Configurations and click Show Config, a Text File will just pop up, save it which will be your backup file in-case you have to restore it.


Option 1 using HP SPP i already posted a article on how to apply it for a Windows Server, the steps are the same just that While Adding Node you type in the IP Address of the Active OA and choose the right type as below.

Note: I am using June HP SPP ..


Option 2 :

1. Download the Bin file from HP Site
2.Expand Active Administrator and click on Firmware update , it will show the current Firmware level


3.Click on Browse and point it to the bin file you downloaded and click Update..
4. Click ok on the below pop-up

5. You will see something like this below saying updating Firmware...
6.That was easy we just updated the OA Firmware , to double check click Rack Firmware and see if it shows updated Firmware version


In-case you guys wondering if this required downtime, well after doing so many updates i can confidently say that this doesn't require downtime and can be updated any time.
If anyone out there had any downtime doing this please share the information to me..


Hope this helps someone!!!!

Monday, December 22, 2014

LESSON LEARNED AFTER COMPLETING FIRMWARE UPGRADES FOR C7000/C3000 ENCLOSURES

Good day! All,

Welcome back! We recently completely Firmware upgrades on all our c7000/c3000  Enclosures and thought would share  all the lesson we have learnt and hopefully this helps some one..


1. Always a confusion on the Order of Applying Firmware to different components on the Enclosures, so below is the order we always followed and it works like a charm

a.Apply ilo Firmware for all the Blades in the enclosure
b.Apply Firmware update for the Physical Blades and if its Windows OS\ESXi apply all the drivers/Firmware as well
c.Apply On-board Administrator Firmware update
d. Last Apply the Virtual Connect Firmware update


2. IF you ever have to replace MidPlane make sure you make a note of the Old serial number and the same number needs to be updated using a putty session by connecting to new On-board Administrator, if you Virtual Connect domain will not connect and all the blades will not power on. A more deep article is out there on internet and also i have posted a article on the same too

3. The best way to do Firmware update on a Windows Server is using HP Support pack

4. While doing physical Servers it always best to copy the HP SPP on to local hard disk and run locally and also if you updating NIC card drivers make sure you keep a copy of old NIC drivers and new drivers handy

5.Always a confusion that when doing NIC card drivers update do we really have to break the teaming and do the update... Well we completed close to 80 odd Physical servers and we did all using HP SPP and we didn't break any NIC teaming and HP SPP is smart enough to update the Firmware. If you closely watch the steps it does, first it updates BIOS/NIC drivers and then it updates the rest..

6. Firmware updates on Windows Clusters you need to be extract careful.. HP SPP worked like a charm expect one instance where the NIC card update got struck and it basically disappeared NIC's from the Server.. so this is the reason to be safer side always make a backup of all the IP Settings and also Keep the NIC drivers locally on the Server.

7. Virtual connect Firmware update, don't use HP SPP because it just takes too long and there is no information at all on the Screen what is going-on on the back ground.. so the safe bet is using Virtual Connect update utility

Note: Firmware update on the Blades need downtime and Firmware update on the Virtual connect you will see packet drops even though you have 2 Virtual connect modules so plan carefully with downtime.


Sunday, December 21, 2014

EVENT ID 47 Corrected Machine Check

Good day! All,

HP DL 580 G7 recently had a unexpected reboot , we couldn't identify the root cause of the unexpected reboot as there was no Memory dump so we started to take a look in patterns before the reboot then we can across this Event ID 47 - memory correction errors all over the logs..
So we went ahead and logged a case with HP and they said they have seen this errors for HP servers having XEON E7 family processor and they gave this link below for more information and steps to be modified to have this corrected and also pointed out that we have some Firmware to be updated as well.. which we are planning to do it soon..

http://h20564.www2.hp.com/hpsc/doc/public/display?docId=emr_na-c03282091


Hope this helps some one!!!!!!!!

Wednesday, December 17, 2014

Failover Clustering Features in vNEXT Server

Good day All,

I was checking the other day on the Clustering blog and stumbled across the vNEXT Failover clustering Video on the Channel 9

Here's the link:
http://channel9.msdn.com/Shows/Edge/Edge-Show-125

All the cluster fans should go check the new features which are going to come in the next release of Windows, in-case you can't view it below are the 2 cool new features

1. Windows Clustering with no Shared storage(kind of answer to VMWARE vSAN)
2. For Multi-site clustering no third part SAN Replication required, in-build features available..

I would encourage every one to go check the video and also Technical preview is out there so start testing.. and i will be doing the same.. so stay tuned for step- step process on both the 2 top features soon..

thanks...................


Monday, December 15, 2014

UNABLE TO CREATE NEW RAID ARRAY

Good day! All,

The other day someone showed me the below screen shot and started saying that i have tried all the things like Run as Administrator, Local admin etc. still when i open  HP Smart Storage Administrator don't see the option of New ARRAY creation

Can any one guess? i looked it and i know the answer? well i said guys go check if someone already have the same screen kept open on the Server.. so they checked there was Active RDP session but was not sure if it was kept open, i said disconnect the session and try it and well now we know the answer

Hope this helps some one :)


Wednesday, November 26, 2014

Outlook Email Registration Fails, Certificate root error

Good day All,

Our Citrix team recently installed Outlook on a Citrix Server and when they started configuring the Outlook client , the Client E-mail registration was failing with the below error ..


Well they tried the best and it was brought to my attention, seeing the error i said its Certificate root issue, they said to me yes we know but its from Verizon root certificate and it should take automatically..

I said hold on, let me show what i was referring.. so i browsed the website on my laptop and clicked on the certificate icon , so i opened and went to Certification path (highlighted in yellow) asked can you check on the Server if both Root and Intermediate Certificate is available in the Certificate.MMC console.


After some search they confirmed back to me that they don't see the Certificates, so i exported them from my laptop and applied on the Server.. then i asked them to test it..

While testing, smile on the face understood that it worked.. and then they came back to me and asked why this is Internet facing Certificate authority we never have to install certificate they said..

So i asked them one question, did you guys check if that Server has access to internet because all our Servers are locked down, well the obvious answer was No. Still they had question saying root certificate should all be Pre-installed on the Server..
I said very true but  as the Server is Windows 2003 OS , the Certificate root looks like changed at some point and root certificates was never updated, finally they got convinced.

On the side note please note that Outlook 2010 and above when Adding client , will use the Exchange web client URL to authenticate..

Hope this helps some one !!!

Tuesday, November 25, 2014

SSL Certificate Private Key Generation

Good day All,

Team was working on a requirement where they have been asked to setup a SSL certificate for a website.. As this Website has to pass through ISA load balancer and we needed the same Web server certificate to be exported along with Private Key to be imported in ISA Server..

We have so many articles out there on how to request a certificate so i wouldn't go over that, so we received the certificate and when double clicked we saw that there was no Private Key attached..


Usually when we send a cer file to Certificate Authority(CA) we usually put a comment saying please send the certificate back with Private key enabled.. but that depends on the CA and we do get certificates back with our Private Key.

So how do we enable Private key there are lot of articles out there saying we can use "Serial Number" properties but that never worked us.. so we always used Thumbprint

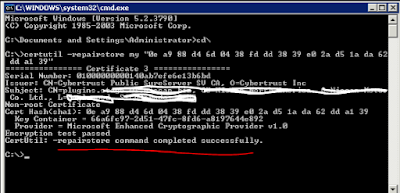
 Say Ctrl+C to copy and execute the following command in a CMD.

Certutil –repairstore my  “0e a9 88 d4 6d 04 38 fd dd 38 39 e0 2a d5 1a da 62 dd a1 39”


Now we see Private Key enabled... So couple of takeaways and points to remember

      1. Always run the Certutil cmd on the Server where we had CSR generated,                                                if not i have seen command unsuccessful error.  
  2 Always make sure that before you run the above command the Certificate is all healthy            with both root and intermediate certificates already installed on the Server.


Hope this helps some one!!!

Monday, November 24, 2014

ERROR OPENING PERFMON.EXE, LOT OF ALERTS GENERATING......

Good day All,

We had a wearied issue lately on couple of Servers and we had lot of Alerts started to generate on our monitoring .

When did a deep dive we found that when we open Perform we started to get alerts as below saying some counters unable to load.. so we did some search and found that we have to load and re-load counters in order to fix it..

CMD # cd\windows\system32 , type lodctr /R


Well it did work for some servers and it didn't fix for others.. so after some search we stumbled across cool little tool which helped us, please find below link to download and more information about the tool..

http://blogs.technet.com/b/askperf/archive/2010/03/05/two-minute-drill-disabled-performance-counters-and-exctrlst-exe.aspx

Hope this helps some one....


Bug Check 0x50, WINDOWS 2008 X86 Server

Good day All,

Welcome back, Today will share with all some issue we encountered on a Windows 2008 x86 Version of a Server,

For some client requirement we had to build a Windows 2008 x86 Server, it was stable for a while till recently every other week it would do a unexpected reboot..As the Server was having 36 GB of memory we only had mini dump enabled.. and Mini dump was pointing to Bug Check 50.. When we check in Windbg about bug check this is what it showed..

Resolution

Resolving a faulty hardware problem: If hardware has been added to the system recently, remove it to see if the error recurs. If existing hardware has failed, remove or replace the faulty component. You should run hardware diagnostics supplied by the system manufacturer. For details on these procedures, see the owner's manual for your computer.
Resolving a faulty system service problem: Disable the service and confirm that this resolves the error. If so, contact the manufacturer of the system service about a possible update. If the error occurs during system startup, restart your computer, and press F8 at the character-mode menu that displays the operating system choices. At the resulting Windows Advanced Options menu, choose the Last Known Good Configuration option. This option is most effective when only one driver or service is added at a time.
Resolving an antivirus software problem: Disable the program and confirm that this resolves the error. If it does, contact the manufacturer of the program about a possible update.
Resolving a corrupted NTFS volume problem: Run Chkdsk /f /r to detect and repair disk errors. You must restart the system before the disk scan begins on a system partition. If the hard disk is SCSI, check for problems between the SCSI controller and the disk.

Finally, check the System Log in Event Viewer for additional error messages that might help pinpoint the device or driver that is causing the error. Disabling memory caching of the BIOS might also resolve it.

Well the first thing we did was updating the Server with Latest HP Support Pack 2014, that didn't help and Server had unexpected reboot again in weeks time..So next thing we check was any antivirus problem with antivirus team and it was clean .. later even checked chkdsk for any disk errors but nothing we could find.. the server was  rebooting every week..and the issue was getting heated up..

So we circled back raised a ticket with hardware vendor .. the only thing they found was memory modules was not in a order so they asked us to try putting in a order .. well we requested downtime and then tried it too.. well this time after 10 days we had the same issue..

Now the issue was getting more attention even though it was internal server we had this issue close to 2 months now..
After all the options the only options we had left was enable Full memory dump , so move files around to accommodate at-least 50 GB  of dump because as i said Server is stacked with 36 GB Memory. We started to wait for a couple of days and then we could capture Memory dump and it was close to 46 GB...

So we started to analyze using Windbg and this is what the analyze -v showed for stack

STACK_TEXT: 
9f9f7964 81c67de4 00000000 e3d64e18 00000000 nt!MmAccessFault+0x10b
9f9f7964 81d96782 00000000 e3d64e18 00000000 nt!KiTrap0E+0xdc
9f9f7a40 81d96258 f307da20 00000000 e3d64024 nt!CmpCheckValueList+0x83
9f9f7a8c 81d9c81a 01000001 009c4020 009c3f70 nt!CmpCheckKey+0x5b4
9f9f7abc 81d9ce48 f307da20 01000001 00000006 nt!CmpCheckRegistry2+0x8c
9f9f7b04 81d9786e 01000001 9f9f7c60 80005a74 nt!CmCheckRegistry+0xf5
9f9f7b60 81d99fdd 9f9f7bb4 00000005 00000000 nt!CmpInitializeHive+0x4c1
9f9f7bd8 81d9c27d 9f9f7c60 00000000 9f9f7c4c nt!CmpInitHiveFromFile+0x19e
9f9f7c18 81d924c5 9f9f7c60 00000000 9f9f7c7b nt!CmpCmdHiveOpen+0x36
9f9f7d14 81d926fa 00000002 81d125a0 00000002 nt!CmpFlushBackupHive+0x2fd
9f9f7d38 81e71cbd 81d1c13c 967612d8 81cbfd4a nt!CmpSyncBackupHives+0x90
9f9f7d44 81cbfd4a 00000000 00000000 967612d8 nt!CmpPeriodicBackupFlushWorker+0x32
9f9f7d7c 81df001c 00000000 c8084d5c 00000000 nt!ExpWorkerThread+0xfd
9f9f7dc0 81c58eee 81cbfc4d 00000001 00000000 nt!PspSystemThreadStartup+0x9d
00000000 00000000 00000000 00000000 00000000 nt!KiThreadStartup+0x16


We still seeing the Registry Hive error so we started to search in the Microsoft site for any Registry Hive and Bug check 50, so we came across this article ..
http://support.microsoft.com/kb/2709236/en-us

The article resembled close to our issues, keeping fingers crossed we applied the hotfix and guess what that turned out to be the fix...

Hope this helps someone out there....


Friday, November 21, 2014

WINDOWS 2003 ,Insufficient System Resource error while taking TSM Backup

Good day All,


We have Windows 2003 which has close to like 1.5 TB of 1 disk and like 600 GB of couple of disk was converted to a Virtual Machine and after that we started to see TSM backup getting failure and Server would just hang with saying Insufficient System Resources and becomes unresponsive..

We have seen this error in past TSM when taking backup consumes all the Page Pool Memory and backups will fail.. so we basically follow the steps in the article, tweak the registry settings and maximize the Paged and NON-Paged pool..
http://support.microsoft.com/kb/304101

After tweaking Backup went fine for couple of weeks and we started to see the same error.. it go so frustrating that we started to have the issue every other day and lot of backup failures started to be reported..

We escalated this to client saying the Backup disk are too big and we should start to migrate the data to either a new Windows 2008 or 2012 OS .

At this stage i got involved and first question i had was any Backup Failure before this Server was refreshed to Virtual Machines and the answer we got was No.

So i was not really buying it because when it was Physical it was working fine with no backup Failure what migrating to Virtual Machine it was not.. So i started to big more.. enabled Poolmon and started to observe the trend.. After checking for some time i saw that the Paged pool was not growing beyond 230 MB and non-paged pool no beyond 100 MB, i said what we had tweaked the registry but still it not set growing.. So we started to recheck the registry setting but that looked all ok...


Well i opened by Windbg, used the kernel debug mode connected to the Server and when i run
 !VM command it clearly showed the Max values of Paged and Non-paged and that was too low even after registry changes..

Further digging i stumble across this article on /3 GB switch which clearly says that only half of Paged /Non-Paged pool will be used..

http://blogs.technet.com/b/askperf/archive/2007/03/23/memory-management-demystifying-3gb.aspx

Guess what when i checked my boot.ini file yes we had that /3GB switch.. so i felt having /3GB switch for a 4 GB memory Server with having IIS Application didn't really made sense to me so i went ahead and removed the /3GB Switch...
After that close to like 4 months now not a single backup failure..  In-fact the article which we used to tweak registry settings to maximize the Paged/Non-Paged Pool clearly asked to check if the boot.ini had that 3GB switch..

Well on the happy note issue got resolved but client decided to postpone the new OS build for now...


Windows Server 2012 accessing Windows 2000 Server, ERROR: The account is not authorized to log in from this station

Good day All,

We recently build a Windows 2012 Server and as part of the Application team requirement they wanted to access Printers on Windows 2000 Server, so when tried to browse and type in \\Server Name we keep getting error as " The account is not authorized to log in from this station" .

So i hopped on to a Windows 2008 Server and when i tried to browse the Server i see i was getting the same error...

As usual browsed across internet and there was couple of articles that matched the error

http://support.microsoft.com/kb/982734

http://support.microsoft.com/kb/281648

After some lab setting up and trying all the combinations we figured it out that only changing the below Settings worked..

Administrative Tools ---> Local Security polices, Security options and change the status to disabled for Microsoft network client: Digitally sign communications (always) and Rebooted.


Hope this help someone out there..


Monday, November 17, 2014

HP PROLIANT GEN8 AGENTLESS MANAGEMENT FLOODS ON ESXi 5.1 u2, we Proved VMWARE wrong!!!

Good day! All,

I know we are away behind on our ESXi upgrade still around 5.1 u2. We recently added new G8 HP Blades to our ESXi infrastructure and started with ESXi upgrade from 5.0 to 5.1 U2.
As all these are HP Blades we downloaded a custom ESXi image for HP and re-mediated all the blades for firmware using Update Manager.

We did all this like 3 months ago, as this was small site with about 60 VM's on 4 ESXi blades we never had any performance issue and for some reason we never identified that this site had DRS issue and VM's are not migrating until one day we started to do some VMTools upgrade on the Virtual Machines.

Started to browse on the internet for the error and we found across this article  which kind of closely matched to our issue.. So we logged a case, VMware was involved and after going through the logs they confirmed the same..

Now we identified the issue so getting down time was big challenge and VMWARE clearly stated that we need to shutdown all the VM's , upgrade AMS or disabled AMS on the ESXi host to fix the DRS issue.

So getting downtime all business was a daunting task so we checked all the VM's and picked a ESXi host with least number of Virtual Machines running on it... So we took the risk asked the business to give down time for 6 Servers and keeping fingers crossed started to work on the issue.

After Uninstalling and re-installing the updated AMS component to our Surprise guess what VMmotion started to work on that ESXi host.. and this just proved VMWARE wrong :)

I know writing this article would be too late may be someone would have tried something like this or most of them have already upgrade to latest ESXi upgrades.. but still if someone out there who still on 5.1 U2 this article would kind of help them in planning properly and not go shutting down all the VM's.

After the upgrade we started to move VM's across to this ESXi host and started to do the same on other ESXi host one by one and end of the day we achieved this will very minimal downtime.

So this just proves that we should always have a development environment but let me guess ESXi  development environment will business spend , leave it for your guys to thing :)

Have a good day!!!!


WINDOWS 2008 R2 SP1 CLUSTER NAME FAILURE! DUPLICATE IP ADDRESS DETECTED

Good day! All,

I got sometime today so started to write couple of issues we encounter which i got involved ,troubleshooted and fixed the issue. Today will cover how we fixed Cluster Name failure..

We have a 2 Active Node Cluster found that Cluster IP Address and Name after failure to other Node didn't come online.

I went in there to other Node tried to bring the cluster online and still no luck..So started to check event logs and everything was clean except that failure of resources..
So i went on to generate the cluster logs using cluster.exe log /g to generate cluster logs on both the nodes and started to investigate further..
Started to look around but still it was not clear why the Cluster resources didn't come online.. So i hopped on to the another node and started to look for any ERR in the cluster logs.. at some point i saw something called duplicate IP Adderss.. i didn't give much attention because this is not newly build cluster and it was working for years now.. so i moved on to search some other errors..

After some troubleshooting we had no luck, then i saw our Monitoring Alert popping up for this Server saying duplicate IP Address.. now that go me puzzled why would it do it and started to check on the IP's...

Checked NSLOOKUP, DNS, PING test all came back clean..

I said to myself there is some where the Server is see duplicate IP's so opened TCP/IP Properties..

to my surprise i saw that Cluster IP Address was added as Secondary IP Address for that Server and when every we moved the Server resource to other Node this IP Address was moving along with it and adding as Secondary IP Address on both Nodes.

I have worked on so many cluster and configured so many still no clear why someone would add the Cluster IP Address to the TCP/IP Properties, what exactly this would achieve i have no idea.. so if someone out there, they have a reason please free to reply me back..

Ok then i removed the IP Address from TCP/IP properties and every thing started to work and resource came back online.

For starters in Windows 2008 there is no way in GUI you can move the cluster group along with Quorum disk to another Node, you need to use powershell or cmd .
Note:In Windows 2012 this has been fixed and now using Failover Cluster Manager you move even Quorum disk and Cluster group.

Cluster group “Cluster Group” /move:<newnode>


Friday, October 10, 2014

2 NIC ports disappeared in a quad core NIC port after HP SPP drivers update

Good day! All,


As part of the BIOS and Firmware upgrade using the June HP Support pack(SPP) we started to upgrade a 2 NODE Windows 2008 R2 Failover Cluster , so the first step we did was failed over all the resources from one Node to the another and then started to push the updates, all went well and Server was rebooted and it came back online.

When we started to do post verification we found that 2 NIC cards of the 4 Port NIC card just disappeared but we where able to see the other 2 NIC's when we open the HP Teaming Software.

Well this is the first time we have seen something like this because if there was NIC card Firmware all 4 NIC's should disappear but we are seeing only 2 missing..

So as part of first troubleshooting step , we dissolved the teaming and re-installed the NIC's card drivers and Firmware again along with Teaming drivers.. After doing this all NIC's showed up and we re-configured the teaming again.

Now we had to do the other NODE so we failed over all the resources the other NODE and for some moment we paused to check how we wanted to proceed , disallow all the Teaming and do the NIC's card update first or let the SPP do the magic.. We took the risk of allowing SPP do his magic and to our surprise nothing happened and everything came back clean..

I am not sure what really happened but after logging a case with HP, there was no concrete answer to what really happened but one thing they Pointed out was if its Windows Sever the best way to upgrade the Firmware is using SPP as its smart enough to follow a order of updating BIOS,NIC cards and Smart Array controller etc..

Hope this help some one and in case some one has a better ideas please share to me...

Thursday, October 9, 2014

WEARIED!!! NIC card status shows Network Cable unplugged

Good day! All,


We started to use June 2014 HP Support Pack for upgrading BIOS and Firmware for all our HP Physical and Blades Servers..The other day we started to do a update on a Blade BL 460 G6 Server,
As we did so many Firmware updated with NEW SPP it took about 20-25 mints per Server but this one started to act and we waited for like a HOUR and it came back saying Firmware update Failed.

So after further investigating the SPP log found that it go struck updating the NIC card drivers and it just failed moving forward... well hopped on the Server using the KVM and when checked all my NIC's in the Server started to show as Network cable unplugged.

It was very wearied and we tried so many option still with no Luck, then decided to revert back the NIC card drivers , uninstalled every thing and went back to old drivers and still the same issue..


Now after uninstalling the new drivers and reverted to OLD NIC drivers the issue didn't resolve, so we started to check the System logs in Virtual Connect Module.. so to our surprise we saw as below..


Port enc0:iobay1:d4 pause-flood detected and automatically disabled

So we see something disabled and started to google around to see why and what caused the issue.. found a article in HP website similar to this

http://h20565.www2.hp.com/portal/site/hpsc/template.PAGE/public/kb/docDisplay/?javax.portlet.begCacheTok=com.vignette.cachetoken&javax.portlet.endCacheTok=com.vignette.cachetoken&javax.portlet.prp_ba847bafb2a2d782fcbb0710b053ce01=wsrp-navigationalState%3DdocId%253Demr_na-c02623029-6%257CdocLocale%253D%257CcalledBy%253D&javax.portlet.tpst=ba847bafb2a2d782fcbb0710b053ce01&sp4ts.oid=3794423&ac.admitted=1393783592336.876444892.492883150

Still poking around we saw this under ETHERNET,ADVANCE SETTINGS UNDER PORT PROTECTION


At this point we didn't Re-enable Ports but we went back to HP and raised a case.. So they suggested to first upgrade all the NIC's on the blade to current version and then click the Re-enable Ports..

After we upgrade the NIC drivers and then Re-enabled Ports all my NIC's started to connect and every thing was up and running..

Hope this helps someone.. ... 


Monday, July 28, 2014

HOW TO UPDATE FIRMWARE USING HP SMART UPDATE MANAGER 6.4.1 WHICH IS PART OF HP SPP PACK.

Good day! All…
HP starting this year for updating Firmware/BIOS using HP SPP pack have moved away from GUI to web based. So there was lot of confusion with updating Firmware with some folks but after using for quite some time I would say this web based is pretty easy to use and is web friendly..
I will show here steps to follow for updating a Firmware for any HP Blade/Physical Servers..


  1. Download the HP SPP ISO from HP website and extract it to a folder
  2. I just extracted the June 2014


  1. Browse to the following path and double click HPSUM.bat file..
D:\HP_Service_Pack_for_Proliant_2014.06.0_784915_001_spp_2014.06.0-SPP2014060.2014_0618.4\hp\swpackages
  1. Depending on the OS Version 32/64 bit Server you are executing the HPSUM batch file that exe will be executed…


  1. Because I am executing on a 64 Bit Blade Server the batch file executed hpsum_bin_x64.exe and a Browser with local host has been opened.


  1. You can click on Get started as below if you want to run SPP against the local Server, but as we want to use this Server Patch Firmware for all HP Hardware we will not click Get Started..


7. Instead we click on the down arrow on the left side corner for web browser as below


8. Click on Baseline Library and this will take you to something similar as below


   9.  Click on Add Baselines and that will pop-up a Window as below...
Change the location Type:  UNC Path


Location Details:
  1. Enter the URI for baseline : D:\HP_Service_Pack_for_Proliant_2014.06.0_784915_001_spp_2014.06.0-SPP2014060.2014_0618.4\hp\swpackages
  2. Provide username and password


And click ADD..


10.Afer adding it will come back to Baseline Library and on the right side corner there will a drop down Window , click on it and that will say Inventory is in progress and after sometime Inventory completed as below and on the right side you will see the location a Baseline Library you just added..


11. Now we have completed adding Baseline Library .So all HP Servers will be scanned against the Baseline Pack we added.. So any new SPP we get we just follow the same process of adding the baseline Library and we can scan against the SPP to apply latest Firmware…


12. Click on the drop down on the HP Smart Update Manager and click on Servers..


13. Servers window will open as below, Click the drop down window


14. A window will open with the option to click Inventory the Local host.. or you can click on Action and click Inventory in there
Note: This Example I am showing how to update Firmware for the local host..


15.   Inventory Window will open as below, Click on Baselines drop down option and you will see the Baseline we added above, just select it and click on Inventory...


16. You will see that the Inventory is in Progress and Local Server is been scanned against the NEW SPP BASELINE Pack…


17. After Inventory is complete you will see Review and Deploy Update option…


18.  After you click (Review and deploy updates) a Deploy Window will Pop-up
Leave all as defaults expect the Reboot Option – change to If needed...


Click on ANALYSIS….


19. After Analysis Deploy Option will get enabled…


20. Click Deploy and it will go back to Servers webpage...
A Progress window can be seen when you click the Right side drop down menu
You can click the status to see all updates and if anything failed the reason for failure…

Will show you how to add a NEW Server which is on the Network, Scan and Update FIRMWARE:


  1. Follow all the Steps as above till Step 13
  2. Click ADD


  1. ADD NEW pop up window will open...
IP:
Type: If it’s Windows, Select Window
Baseline: Click the Drop down and Select the baseline pack we added


  1. After adding... Continue with Step 14...


Well this was easy… next time will try to capture steps for On-board Administrator/Virtual Connect... till then all have a good day…..

Friday, June 27, 2014

How to Troubleshoot Storage Performance in Vmware using Esxtop

How to Troubleshoot Storage Performance in Vmware using Esxtop Command

Symptoms

1. First check the Server performance while accessing any file or folder if it’s normal then there is no issue with Storage to confirm…check the Storage log on the Esx Host in the VC..
2. While accessing file or folder if the server hung for 10-15 seconds then there is an issue on Disk I/O On the VM…

Steps to find out Lun issue on the Esxi using Esxstop command.

1. Log in to Esxi using Putty.
2. Run the command esxtop
To monitor storage performance on a per-LUN basis:
3.Start esxtop by typing esxtop from the command line.
4. Press u to switch to disk view (LUN mode).
5. Press f to modify the fields that are displayed.
6. Press b, c, f, and h to toggle the fields and press Enter.
7. Press s and then 2 to alter the update time to every 2 seconds and press Enter.
Maximum Threshold Value for Latency is 20 but we are getting 27-45 on Every 5 minutes.
To monitor storage performance on a per-virtual machine basis:
Start esxtop by typing esxtop at the command line.
Type v to switch to disk view (virtual machine mode).
Press f to modify the fields that are displayed.
Press b, d, e, h, and j to toggle the fields and press Enter.
Press s and then 2 to alter the update time to every 2 seconds and press Enter.
See Analyzing esxtop columns for a description of relevant columns.
Virtual Machine Performance on Storage.
The Latency value should not be more than 150 sec if it’s more than 350 or above seems to be issue with
Lun on the Datastore..
To monitor storage performance per HBA:
Start esxtop by typing esxtop at the command line.
Press d to switch to disk view (HBA mode).
To view the entire Device name, press SHIFT + L and enter 36 in Change the name field size.
Press f to modify the fields that are displayed.
Press b, c, d, e, h, and j to toggle the fields and press Enter.
Press s and then 2 to alter the update time to every 2 seconds and press Enter.
See Analyzing esxtop columns for a description of relevant columns.
Note:
If the Latency value more than recommended counter then there is issue with Connectivity with storage for Load balancing on Multipath
Solution
1. Log in to VC or Host using VI Client
2. Find the Datastore where the VM is configured.
3. Click the properties of the Datastore.
4. Check the multipath policy on the Datastore. Whether it’s fixed or MRU or RR…
 To confirm check the other Datastore whether what policy is set


Provide the Target ID to storage team to confirm which one we need to set at Active I/O for disk performance on the HBA.

After confirmation from storage team which Target we need to select from Esxi…
Go to the storage and change the Target just right click and select preferred to the target.
So that Disk I/O will pass through the Target for further performance.