Saturday, April 9, 2016

Esxi host - Pause Flood Protection - VM's locked.

Good day All,
Welcome back!!!

Today will go over a issue we had couple of days ago on a Esxi host. Just to give a brief on our environment we have a HP C7000 Frame and 6 blades are running Esxi covering about 100 odd Virtual machines. So out of the 6 blade we had about 15 VM's running on a Esxi host and the host went to isolation mode.

During the outage we logged in to ILO and try to reboot the ESXi host to see if this kicks start's the HA feature but no luck as any traffic from the blade was completely blocked or stopped.

As we started to run out of time we went for work ground to fix the issue as during the outage we couldn't identify the root cause.
So following are the steps we performed

1. Disconnected the failed ESXi
2.Took a list of all VM's
3.Power down all the VM's
4. Removed the whole ESXi from cluster and from inventory
5.Browsed the datastore for each VM, add them to inventory and powered on
6, During the boot we choose the option "i moved it"

Note sure when Esxi host was hard rebooted why Datastore heart-beating didn't kick start HA and move the VM's that still we are investigating.

Hope this helps someone and until next one you all have a good day!!!


Thursday, March 24, 2016

NFS Storage for ESXi5.5

Good day All,

Welcome back!!!

In-case your are not a big fan of iscsi target Server but want to use NFS for shared storage to create a ESXi cluster here are the below steps which i followed and worked for me...


1. We need to add the Feature if already File Server role is enabled, if not then enable Server for NFS under File and Storage Service ,File and iSCSI Services as below


2.  Create a Folder which you want to be shared on the Esxi host..in my example i created as NFS_Mount.
Right click got to Properties and click on NFS Sharing tab and click Manage NFS Sharing


Change the permission from Read only to Read-Write and click allow Root access if you need to login as root and configure the storage on ESXi host as below


Click ok apply it and close the properties window.

3. Login to Esxi using the vSphere client , go to Configuration and click Storage.
Under storage click Add Storage


Select NFS


Provide a target Server where NFS share is created, give the folder name you have used and datastore name and click Next


Review everything and click Finish


So you have successfully add the NFS share ..


you can do the same for the other ESXi host and use it in your LAB incase you ever have to build a ESXi cluster.


Hope this helps someone and until next one you all have a good day!!!

Windows 2012 R2 iSCSI Target Server for Esxi 5.5

Good day All,

Welcome back!!!
Its been a break couple of days lot of other work kept me busy in writing a post.
As i am still playing with my Nano Servers, thought to setup in Parallel a ESXi Cluster too so that i can test and play both in VMware and also Hyper V.

When it comes to storage earlier i used open filer a VM appliance which you can download and configure as iSCSI target Server as Windows based iSCSI Target Server never worked.

So with Windows 2012 R2 inbuilt ISCSI target i started to test the ESXi host to see if this recognizes  the Luns.

Note: If you see the below Lab details, i have used a dedicated iSCSI IP for communication.

Lab:


Domain Name: vlab

Domain Controller:

FOODC - 192.168.1.20 Windows 2012 R2
iSCSI IP: 192.168.2.20

ESX HOSTS:

FOOESX1: 192.168.1.81
iscsi IP: 192.168.2.81

FOOESX2: 192.168.1.82
iscsi IP: 192.168.2.82


Setting up iSCSI Target on Windows 2012 R2 i will not go over because i went in detail in my First post this year and you can check the link

Steps to be done on the ESXi Host:


1. install the vSphere Client
2. Connect the ESxi host
3.Click Configuration tab and make sure to update Time Configuration, DNS and Routing


4.Click on Network Adapters and make sure you have a dedicated NIC for iscsi traffic.
So if you see below i have added 1 more NIC for iscsi traffic called vmnic1


5. Go to Networking and click on Add networking as below


a. Select VMKernel and click next


b, Select a dedicated NIC for iscsi traffic and click Next


c. Keep the default or if you need to change the name from VMKernel you can do it and click next


d. Assign a IP Address for the NIC and click Next


e.Click next and finish and you have just created a VMKernel Port group and a dedicated switch for iscsi traffic
 

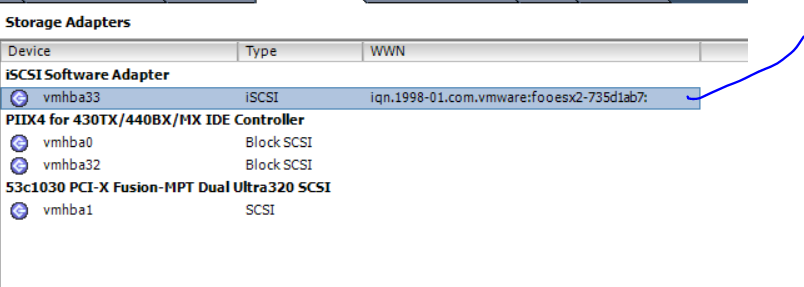
6. Now its time add the iscsi initiator , go to storage adapters and click Add


7. Ping the 2 Esxi host VMKernal IP from iscsi target server to make sure its pinging on the dedicated NIC


8. Now go to Windows 2012 R2 Server, create a iSCSI Virtual disk and add the 2 esxi host IP address..


9. Now in storage Adapters click Properties


on the Network configuration tab, add the vmkernel port group we created earlier.


Under Dynamic Discovery add the iscsi target Server IP and click ok


Now automatic rescan of adapter will happen or you do it manually by clicking Rescan All...
As seen below the new 90 GB Lun is attached and mounted to ESXi host.


9. Follow the same steps on the other ESXi host


Well this was easy.. hope this helps someone and until next one you all have a good day!!!!

Monday, February 29, 2016

Windows Boot Process

Good day All,
Welcome back!!!
I am not going to take credit for this screen shot just took it from Microsoft Virtual academy course, check it out if need to learn more.

Just putting them together so that we can have this handy when trying to troubleshoot a Windows boot issue to understand which part of the process may be failing..


Various process that gets loaded during the boot process:


If anyone really wants to learn more on each phase of boot process and also various memory Management terms best book to have handy is System Internals 2 Part series, excellent books to have it in your store.
Hope this helps someone, until next one you all have good day!!!

Tuesday, February 23, 2016

Event Log - High CPU

Good day All,

Welcome back!!!

Today we will go over how we recently troubleshooted high CPU issue.

The OS issue reported was Windows 2012


As soon we see the task manager we can say that WMI is the issue and we started to look around how to fix WMI.

We ran couple of commands for WMI and it was all good and none of the articles for WMI issue reported applicable to Windows 2012.

So first thing we did was as Service host was common for 4 Service including WMI, we  separated them and so that Wmi can have it's own Service host using the below command.

sc config winmgmt type= own

Not sure how many of them know what is xperf? if not please google .. handy little tool to troubleshoot lot of Windows performance issue.
So i ran xperf for like 10 mints captured high cpu and when i check for wmi process this is what i see...


Wmi calling the Service host with PID 724 , this Service host if consuming lot of CPU and intent its spiking the wmi.

So we need to find out what Service are involved in this Service host, and which is spiking it..

this is where Resource Monitor showed his magic


So when i clicked the Svchost i could clearly see that Event log Service which is using the same process is Spiking for high CPU.

Now started to wonder Event log? we couldn't disable it to check it so i started to take a look at all the event logs, first thing i did was cleared all the logs and saved them and started to monitor,,

When i checked the Security logs it was filled in just 2 sec 120 MB, i was puzzled so cleared one more time and checked again.. same thing So now i understood lot of alerts are been generated, security log is getting filled and then after its filled it clearing the old logs and over riding and so the whole process is consuming lot of CPU.

So when i started to check the eventlog i see lot of event id 4663, which is basically telling that some is writing to a folder and that is getting audited.
Well now we know what is been audited, checked group policy to see if Audit object Access was enabled and sure it was...

As soon as we moved the Computer object from the OU having this group policy, CPU spike dropped down and everything went to Normal.

We have close to 1000 Servers in the OU why one Particular Server had this group policy issue is still to be investigate...
If anyone have thoughts welcome to share...

Hope this helps someone and until next one all have a good day!!!!

Wednesday, February 17, 2016

Nano Servers- 2 Node Hyper V Cluster

Good day All,

Welcome back!!!

I have been playing with Nano Servers, so thought of creating a Hyper V cluster see how it goes.. Not much of challenges but couple of little hurdles will share it .

Anyone missed how to create  your First Nano Server, please check my post


Lab: Created 2 Nano Servers with Hyper V roles, Installed Failover Clustering Feature.

NANO2016A : 192.168.1.42
NANO2016B : 192.168.1.43
NANHYPVERV: 192.168.1.44 - Cluster Name


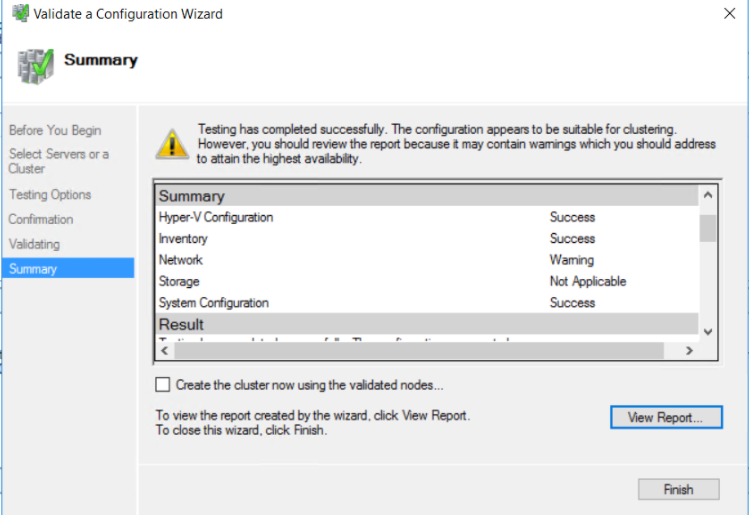
1. You can't run Cluster Validation of Nano Servers from Windows 2012 R2 Server, you will need a Windows 2016 installed. So i have a VM with Windows 2016 installed


Note: I got couple of warnings because Firewall is disabled on both Nodes and also there is not Private heart beat network and no teaming for Prod nic as well.

2.
Provided the Cluster name and IP


3. This was simple, Cluster formed ..


4. if you noticed Quorum Settings its showing the Witness as None that is because there is no Witness disk , so how did Cluster get created????


if you have not heard of dynamic quorum in Windows 2012, then you should check out the below articles.. which goes over what is dynamic quorum, what is Node weight and how it is been playing under the hood to keep the cluster alive

https://www.petri.com/what-is-windows-server-2012-r2-dynamic-quorum
https://technet.microsoft.com/en-in/library/jj612870.aspx

Unless you didn't go over the above two articles you may not understand the Current Vote below


Note: If you like to change the quorum settings then you can change to File Share Witness if required, but i have left it like this

5.
 If you ready to create Virtual Machines, but how as i have already created a Windows 2012R2 Scale Out File Server i will use the same share to Store VM's .

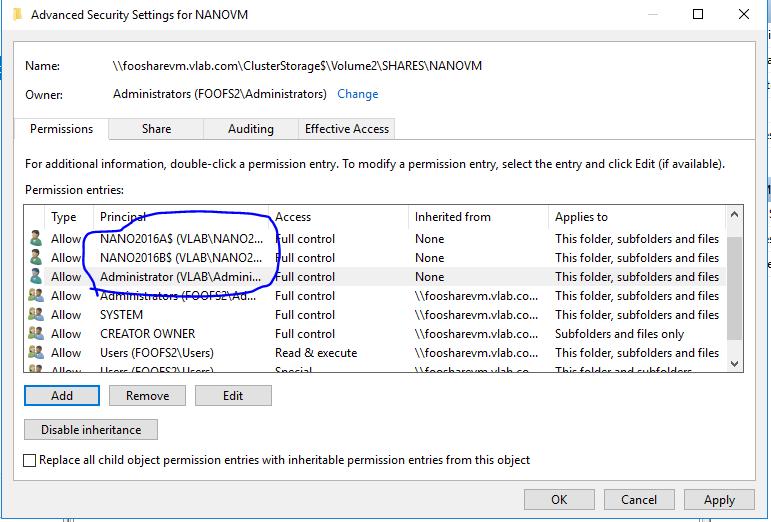
First thing we need to do is give Full permission to below ID's on the share

Nano Servers Computer Account
Administrator who is going to manage the HyperV
System Account


As i told before we have launched Failover Manager on a Window 2016 and created  the Hyper V  cluster right? so now why i use the wizard to create the Virtual Machine i started to get the below errors


The reason we seeing this because we are running Failover Manager from a Windows 2016 Server so its checking for delegation for the Nano Servers on the file share, more information on Why we need delegation check the below link

http://blogs.msdn.com/b/taylorb/archive/2012/03/20/enabling-hyper-v-remote-management-configuring-constrained-delegation-for-smb-and-highly-available-smb.aspx

if you your forest functional level is 2012 then you follow the steps in below article

http://www.thomasmaurer.ch/2014/02/hyper-v-over-smb-set-smb-constrained-delegation-via-powershell/

After enabling delegation wait for sometime before you start creating, i have seeing setting taking time like 10mints not sure why :)

Now you should be able to create your Virtual Machine on Nano Hyper v Cluster and do Live Migration.


As this is still Technical Preview i would think MS would do lot of modifications before final release.

As i keep testing will either update the same blog or will post new one .. hopefully this helps someone and until next on you all have a good day!!!

Sunday, February 14, 2016

Replacing a disk in 2 Node Windows 2008 R2 SP1 Cluster

Good day All,

Welcome back!!!

We had a requirement to replace a GPT formatted disk which had Oracle Database file to a new disk MBR formatted and files needed to be copied over, so this is what the steps we followed

1. All Application was shutdown
2.All the resources in the cluster was brought down in Failover Cluster Manager
3.Right click the GPT disk online ex drive letter is S
4.Requested same size new LUN to be presented by SAN team
5.Formatted the disk with MBR and assigned a drive letter ex Z
Note: the new LUN Z shouldn't be added to Cluster yet.
6.Used xcopy to copy over the Database file from S to Z
xcopy s: z: /e/v/c/h/k/o/y
7.Now take the old LUN S offline
8.Got to cluster group where the S drive is present, right click , click more action and click Repair
9.You will see a pop up window showing the new LUN Z
10 select it and click ok, Cluster will do the magic of disk signature updating etc and it will say updated .click ok and that's it.
11. Right click the disk and bring it online, you will see that old drive letter Z is still present.So click change drive letter and update to S and take the disk offline
12. Now go to Storage group, Click Add disk and you will see the old GPT formatted disk in there, select it and add to Cluster.When you refresh you will see that drive letter is still showing as S, so rename that to Z.
13. Now go to the cluster group , bring the S drive online and then bring all the resources online and test the failover.
14. If you need  Z drive to be reclaimed by storage team then delete the disk from Cluster, go to disk management right click bring the disk online, remove the drive letter and take it offline and ask the Storage team to reclaim it.

Hope this helps someone and until next one you all have good day!!!!