Friday, October 10, 2014

2 NIC ports disappeared in a quad core NIC port after HP SPP drivers update

Good day! All,


As part of the BIOS and Firmware upgrade using the June HP Support pack(SPP) we started to upgrade a 2 NODE Windows 2008 R2 Failover Cluster , so the first step we did was failed over all the resources from one Node to the another and then started to push the updates, all went well and Server was rebooted and it came back online.

When we started to do post verification we found that 2 NIC cards of the 4 Port NIC card just disappeared but we where able to see the other 2 NIC's when we open the HP Teaming Software.

Well this is the first time we have seen something like this because if there was NIC card Firmware all 4 NIC's should disappear but we are seeing only 2 missing..

So as part of first troubleshooting step , we dissolved the teaming and re-installed the NIC's card drivers and Firmware again along with Teaming drivers.. After doing this all NIC's showed up and we re-configured the teaming again.

Now we had to do the other NODE so we failed over all the resources the other NODE and for some moment we paused to check how we wanted to proceed , disallow all the Teaming and do the NIC's card update first or let the SPP do the magic.. We took the risk of allowing SPP do his magic and to our surprise nothing happened and everything came back clean..

I am not sure what really happened but after logging a case with HP, there was no concrete answer to what really happened but one thing they Pointed out was if its Windows Sever the best way to upgrade the Firmware is using SPP as its smart enough to follow a order of updating BIOS,NIC cards and Smart Array controller etc..

Hope this help some one and in case some one has a better ideas please share to me...

Thursday, October 9, 2014

WEARIED!!! NIC card status shows Network Cable unplugged

Good day! All,


We started to use June 2014 HP Support Pack for upgrading BIOS and Firmware for all our HP Physical and Blades Servers..The other day we started to do a update on a Blade BL 460 G6 Server,
As we did so many Firmware updated with NEW SPP it took about 20-25 mints per Server but this one started to act and we waited for like a HOUR and it came back saying Firmware update Failed.

So after further investigating the SPP log found that it go struck updating the NIC card drivers and it just failed moving forward... well hopped on the Server using the KVM and when checked all my NIC's in the Server started to show as Network cable unplugged.

It was very wearied and we tried so many option still with no Luck, then decided to revert back the NIC card drivers , uninstalled every thing and went back to old drivers and still the same issue..


Now after uninstalling the new drivers and reverted to OLD NIC drivers the issue didn't resolve, so we started to check the System logs in Virtual Connect Module.. so to our surprise we saw as below..


Port enc0:iobay1:d4 pause-flood detected and automatically disabled

So we see something disabled and started to google around to see why and what caused the issue.. found a article in HP website similar to this

http://h20565.www2.hp.com/portal/site/hpsc/template.PAGE/public/kb/docDisplay/?javax.portlet.begCacheTok=com.vignette.cachetoken&javax.portlet.endCacheTok=com.vignette.cachetoken&javax.portlet.prp_ba847bafb2a2d782fcbb0710b053ce01=wsrp-navigationalState%3DdocId%253Demr_na-c02623029-6%257CdocLocale%253D%257CcalledBy%253D&javax.portlet.tpst=ba847bafb2a2d782fcbb0710b053ce01&sp4ts.oid=3794423&ac.admitted=1393783592336.876444892.492883150

Still poking around we saw this under ETHERNET,ADVANCE SETTINGS UNDER PORT PROTECTION


At this point we didn't Re-enable Ports but we went back to HP and raised a case.. So they suggested to first upgrade all the NIC's on the blade to current version and then click the Re-enable Ports..

After we upgrade the NIC drivers and then Re-enabled Ports all my NIC's started to connect and every thing was up and running..

Hope this helps someone.. ... 


Monday, July 28, 2014

HOW TO UPDATE FIRMWARE USING HP SMART UPDATE MANAGER 6.4.1 WHICH IS PART OF HP SPP PACK.

Good day! All…
HP starting this year for updating Firmware/BIOS using HP SPP pack have moved away from GUI to web based. So there was lot of confusion with updating Firmware with some folks but after using for quite some time I would say this web based is pretty easy to use and is web friendly..
I will show here steps to follow for updating a Firmware for any HP Blade/Physical Servers..


  1. Download the HP SPP ISO from HP website and extract it to a folder
  2. I just extracted the June 2014


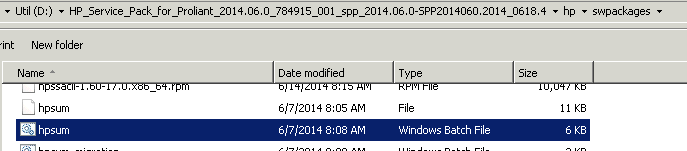
  1. Browse to the following path and double click HPSUM.bat file..
D:\HP_Service_Pack_for_Proliant_2014.06.0_784915_001_spp_2014.06.0-SPP2014060.2014_0618.4\hp\swpackages
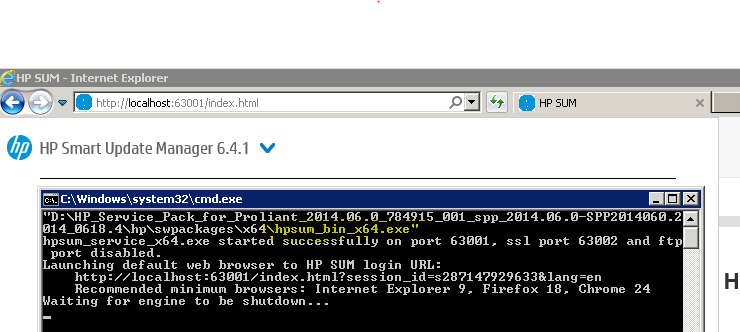
  1. Depending on the OS Version 32/64 bit Server you are executing the HPSUM batch file that exe will be executed…


  1. Because I am executing on a 64 Bit Blade Server the batch file executed hpsum_bin_x64.exe and a Browser with local host has been opened.


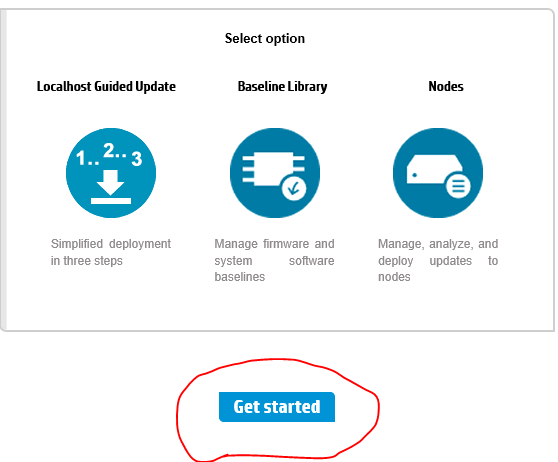
  1. You can click on Get started as below if you want to run SPP against the local Server, but as we want to use this Server Patch Firmware for all HP Hardware we will not click Get Started..


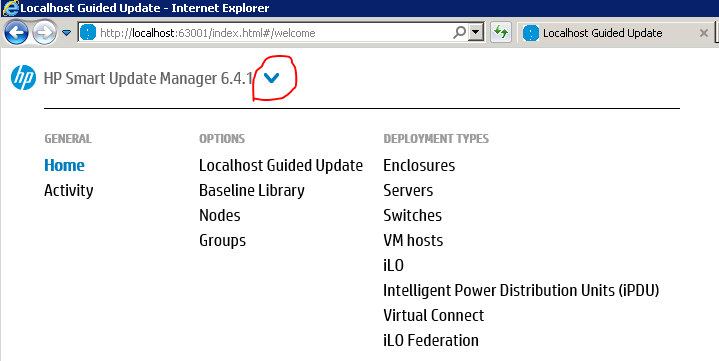
7. Instead we click on the down arrow on the left side corner for web browser as below


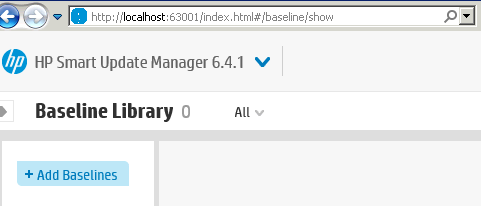
8. Click on Baseline Library and this will take you to something similar as below


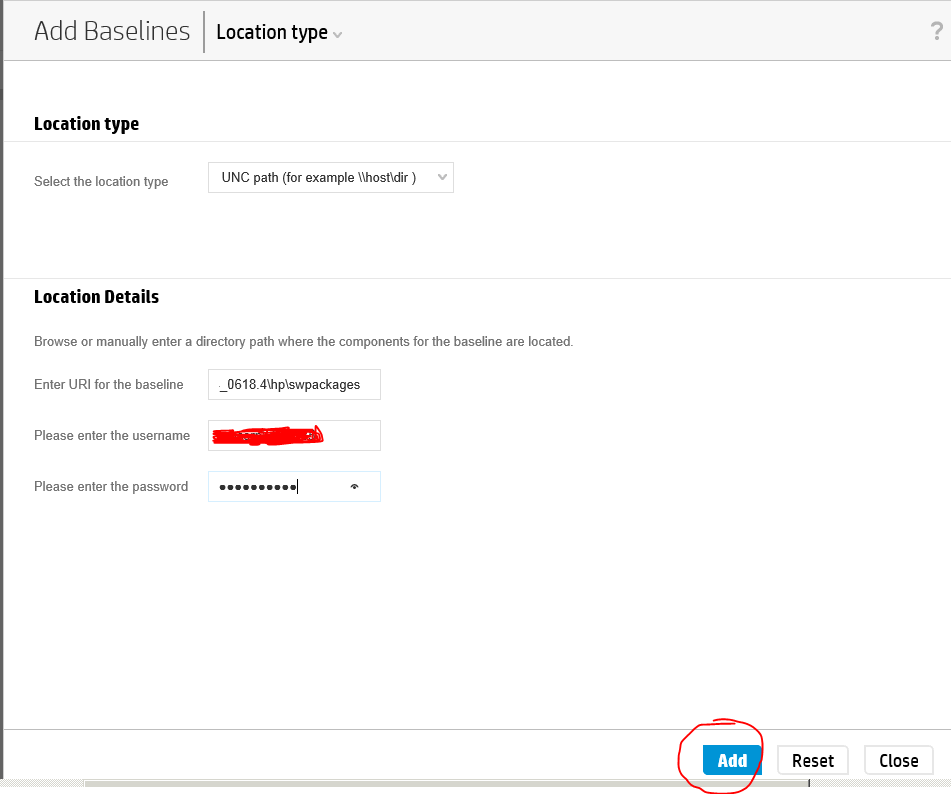
   9.  Click on Add Baselines and that will pop-up a Window as below...
Change the location Type:  UNC Path


Location Details:
  1. Enter the URI for baseline : D:\HP_Service_Pack_for_Proliant_2014.06.0_784915_001_spp_2014.06.0-SPP2014060.2014_0618.4\hp\swpackages
  2. Provide username and password


And click ADD..


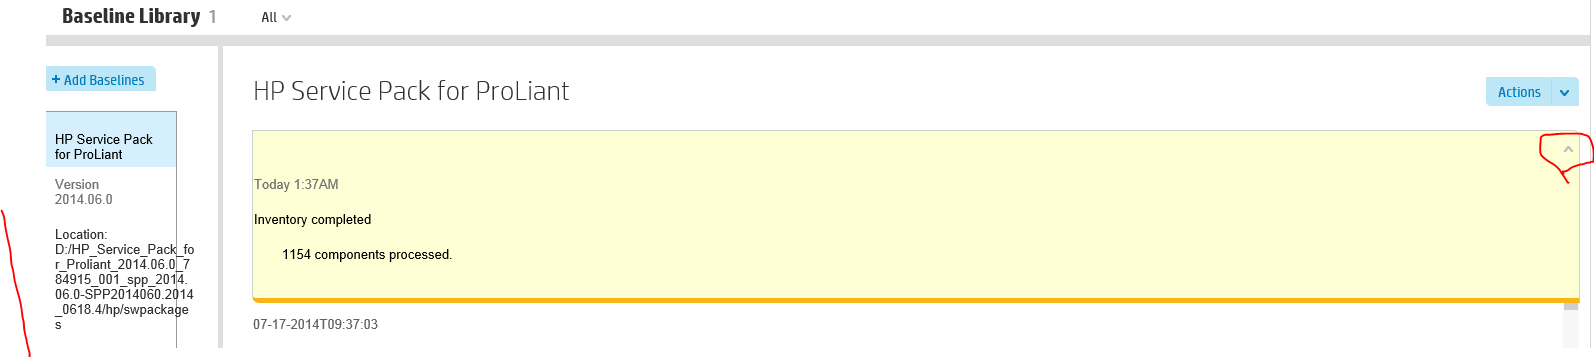
10.Afer adding it will come back to Baseline Library and on the right side corner there will a drop down Window , click on it and that will say Inventory is in progress and after sometime Inventory completed as below and on the right side you will see the location a Baseline Library you just added..


11. Now we have completed adding Baseline Library .So all HP Servers will be scanned against the Baseline Pack we added.. So any new SPP we get we just follow the same process of adding the baseline Library and we can scan against the SPP to apply latest Firmware…


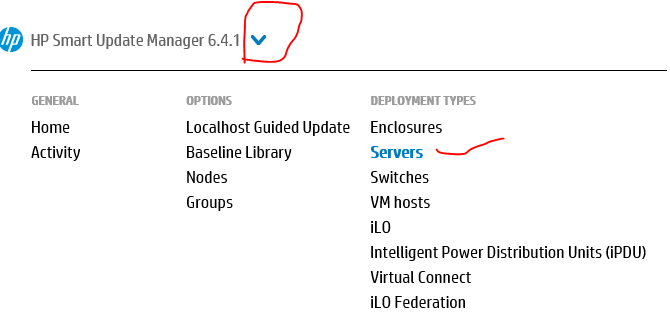
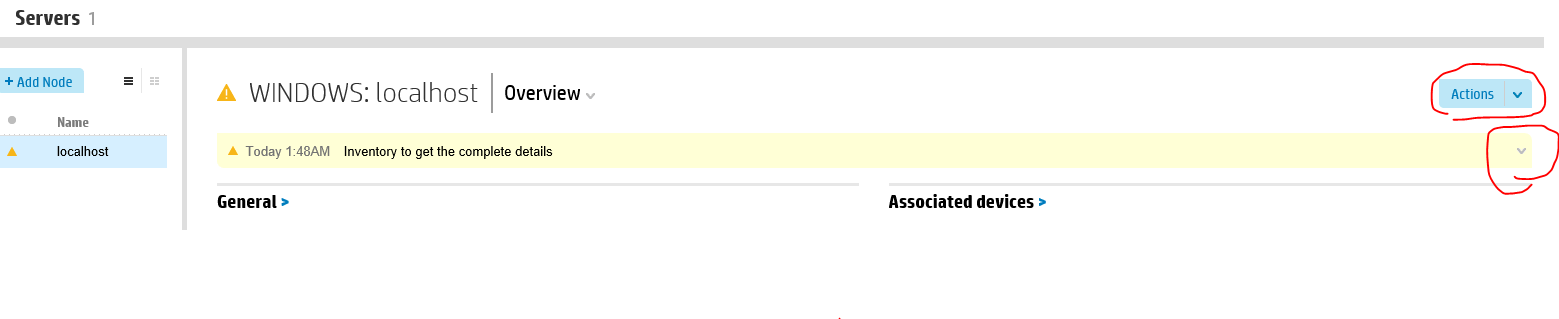
12. Click on the drop down on the HP Smart Update Manager and click on Servers..


13. Servers window will open as below, Click the drop down window


14. A window will open with the option to click Inventory the Local host.. or you can click on Action and click Inventory in there
Note: This Example I am showing how to update Firmware for the local host..


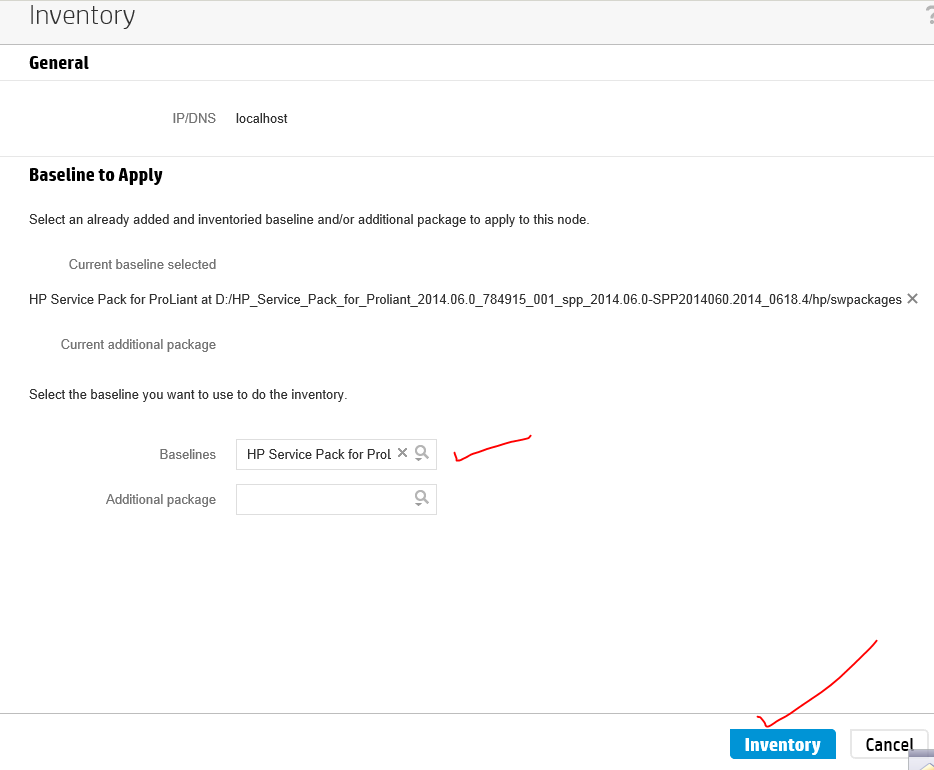
15.   Inventory Window will open as below, Click on Baselines drop down option and you will see the Baseline we added above, just select it and click on Inventory...


16. You will see that the Inventory is in Progress and Local Server is been scanned against the NEW SPP BASELINE Pack…


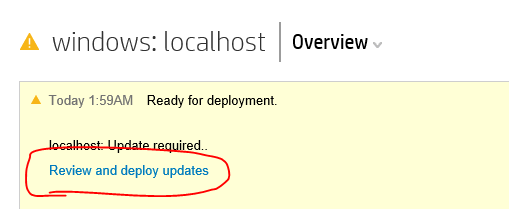
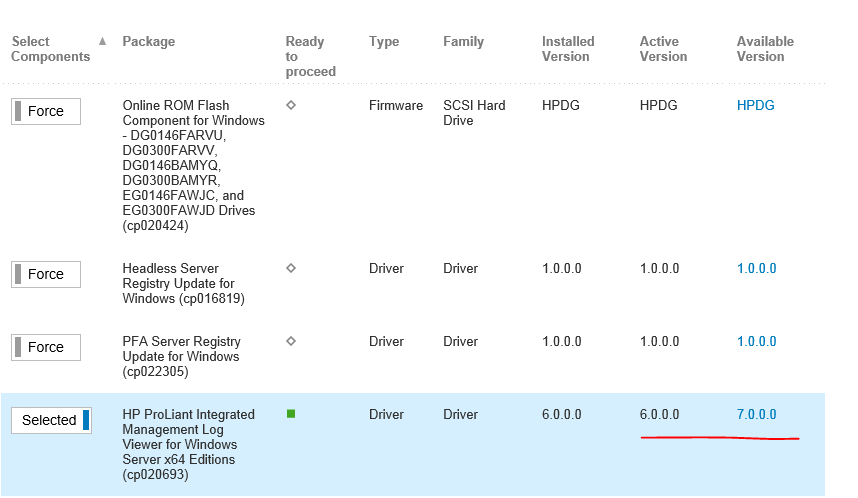
17. After Inventory is complete you will see Review and Deploy Update option…


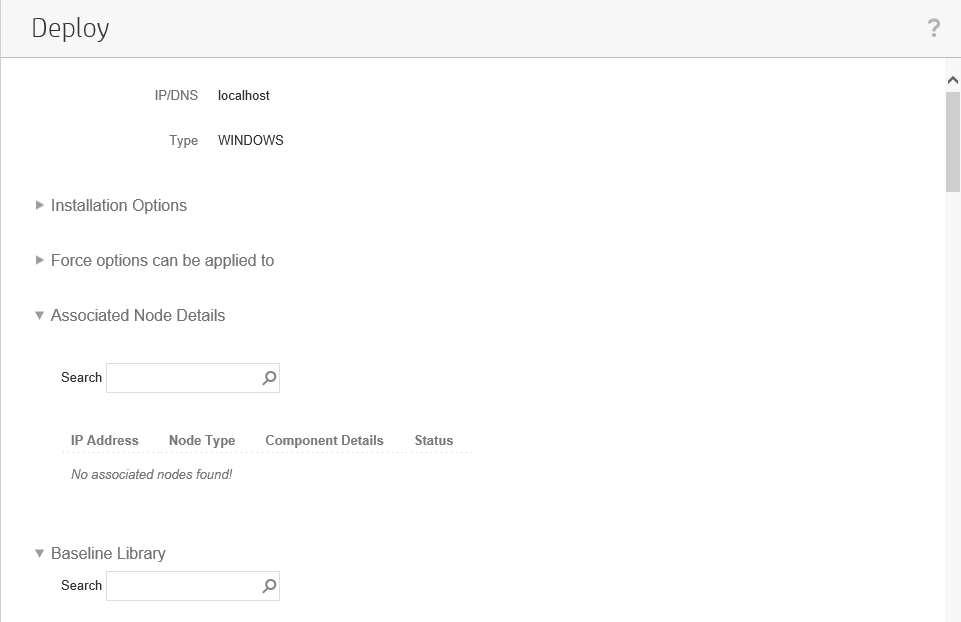
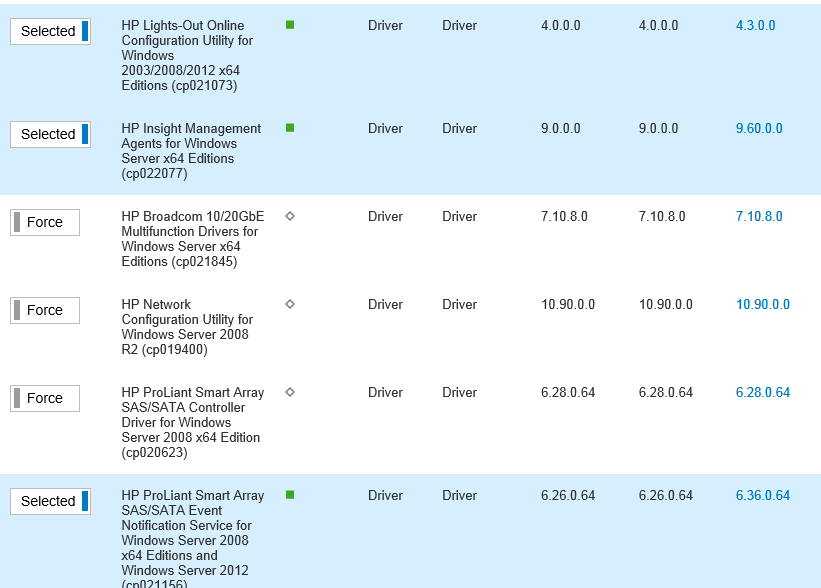
18.  After you click (Review and deploy updates) a Deploy Window will Pop-up
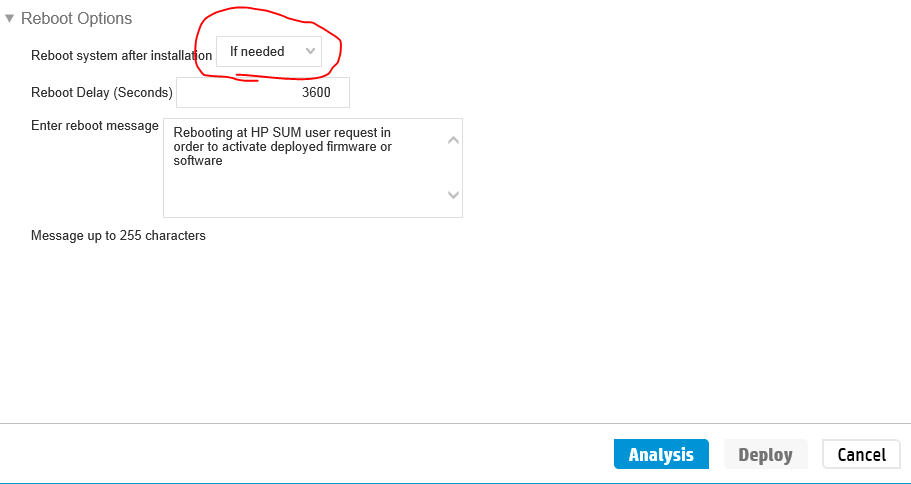
Leave all as defaults expect the Reboot Option – change to If needed...


Click on ANALYSIS….


19. After Analysis Deploy Option will get enabled…


20. Click Deploy and it will go back to Servers webpage...
A Progress window can be seen when you click the Right side drop down menu
You can click the status to see all updates and if anything failed the reason for failure…

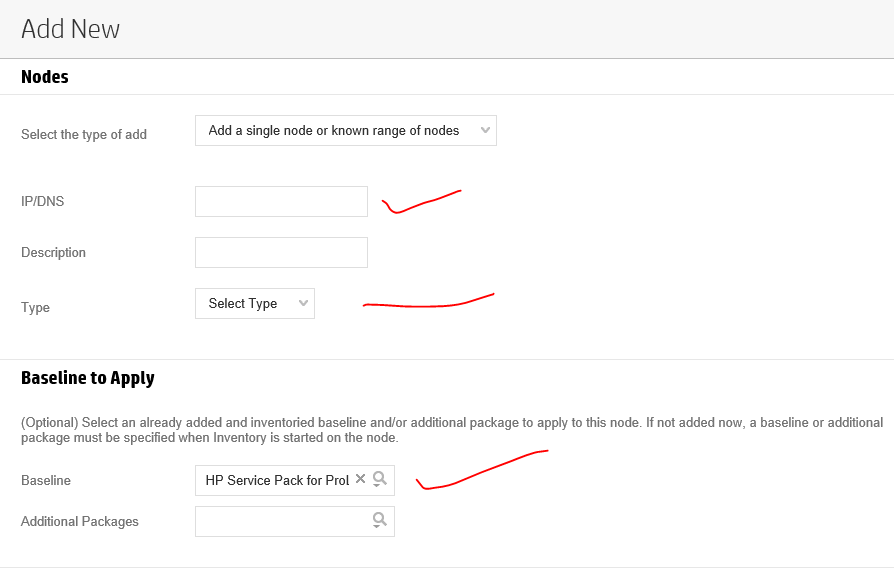
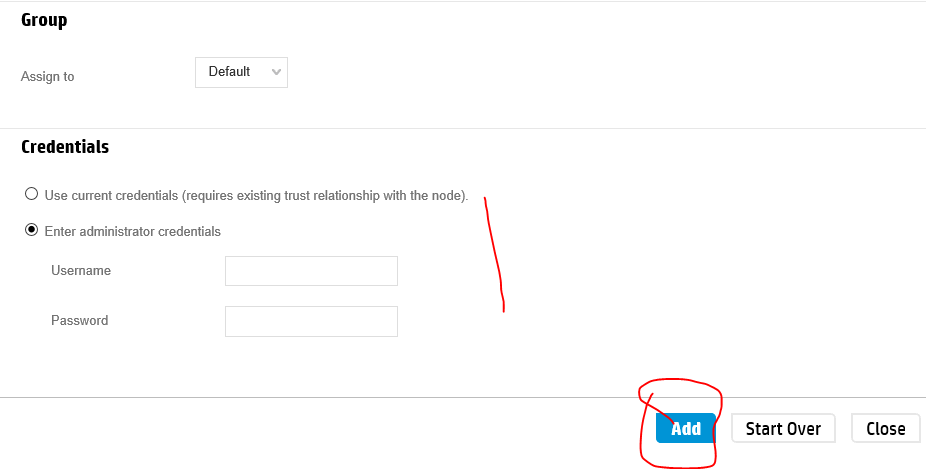
Will show you how to add a NEW Server which is on the Network, Scan and Update FIRMWARE:


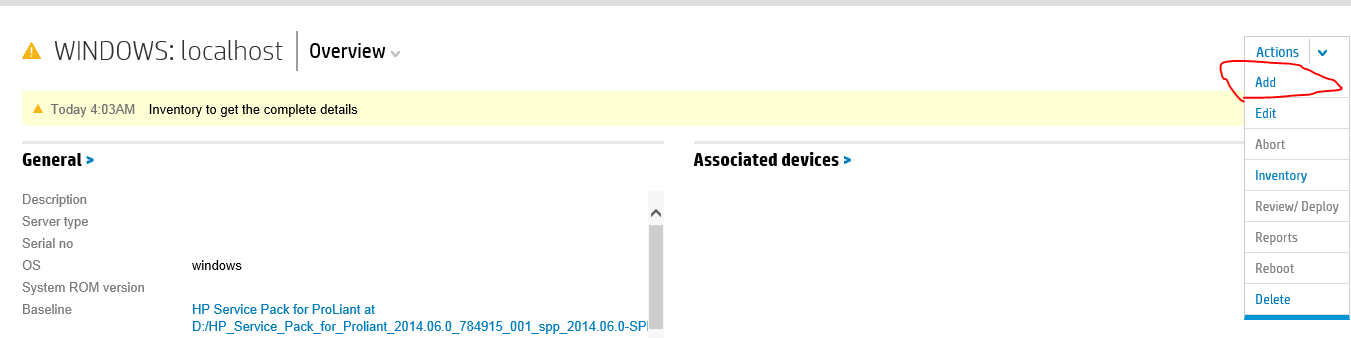
  1. Follow all the Steps as above till Step 13
  2. Click ADD


  1. ADD NEW pop up window will open...
IP:
Type: If it’s Windows, Select Window
Baseline: Click the Drop down and Select the baseline pack we added


  1. After adding... Continue with Step 14...


Well this was easy… next time will try to capture steps for On-board Administrator/Virtual Connect... till then all have a good day…..

Friday, June 27, 2014

How to Troubleshoot Storage Performance in Vmware using Esxtop

How to Troubleshoot Storage Performance in Vmware using Esxtop Command

Symptoms

1. First check the Server performance while accessing any file or folder if it’s normal then there is no issue with Storage to confirm…check the Storage log on the Esx Host in the VC..
2. While accessing file or folder if the server hung for 10-15 seconds then there is an issue on Disk I/O On the VM…

Steps to find out Lun issue on the Esxi using Esxstop command.

1. Log in to Esxi using Putty.
2. Run the command esxtop
To monitor storage performance on a per-LUN basis:
3.Start esxtop by typing esxtop from the command line.
4. Press u to switch to disk view (LUN mode).
5. Press f to modify the fields that are displayed.
6. Press b, c, f, and h to toggle the fields and press Enter.
7. Press s and then 2 to alter the update time to every 2 seconds and press Enter.
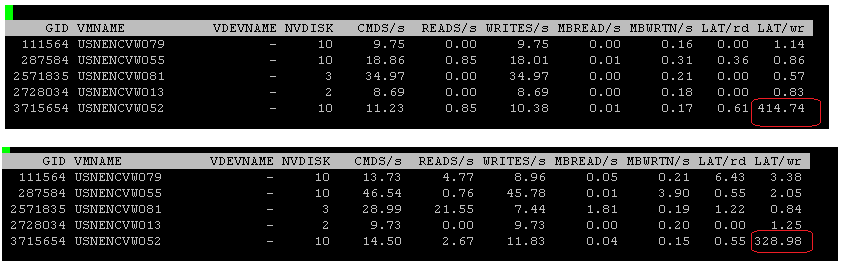
Maximum Threshold Value for Latency is 20 but we are getting 27-45 on Every 5 minutes.
To monitor storage performance on a per-virtual machine basis:
Start esxtop by typing esxtop at the command line.
Type v to switch to disk view (virtual machine mode).
Press f to modify the fields that are displayed.
Press b, d, e, h, and j to toggle the fields and press Enter.
Press s and then 2 to alter the update time to every 2 seconds and press Enter.
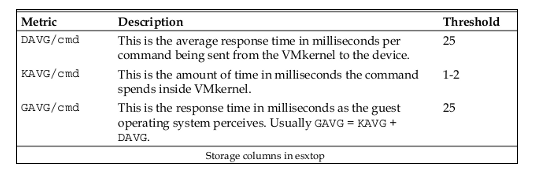
See Analyzing esxtop columns for a description of relevant columns.
Virtual Machine Performance on Storage.
The Latency value should not be more than 150 sec if it’s more than 350 or above seems to be issue with
Lun on the Datastore..
To monitor storage performance per HBA:
Start esxtop by typing esxtop at the command line.
Press d to switch to disk view (HBA mode).
To view the entire Device name, press SHIFT + L and enter 36 in Change the name field size.
Press f to modify the fields that are displayed.
Press b, c, d, e, h, and j to toggle the fields and press Enter.
Press s and then 2 to alter the update time to every 2 seconds and press Enter.
See Analyzing esxtop columns for a description of relevant columns.
Note:
If the Latency value more than recommended counter then there is issue with Connectivity with storage for Load balancing on Multipath
Solution
1. Log in to VC or Host using VI Client
2. Find the Datastore where the VM is configured.
3. Click the properties of the Datastore.
4. Check the multipath policy on the Datastore. Whether it’s fixed or MRU or RR…
 To confirm check the other Datastore whether what policy is set


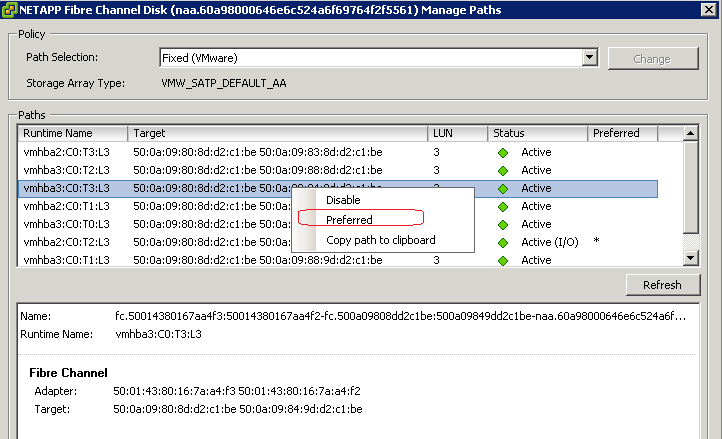
Provide the Target ID to storage team to confirm which one we need to set at Active I/O for disk performance on the HBA.

After confirmation from storage team which Target we need to select from Esxi…
Go to the storage and change the Target just right click and select preferred to the target.
So that Disk I/O will pass through the Target for further performance.


Friday, May 23, 2014

HP BLADE WILL NOT POWER UP AFTER MIDPLANE REPLACEMENT

All,

So other day we started with a planned activity of replacing a midplane on a C3000 enclosure..
what was the issue, let me elaborate more..

Issue: Fan speeds on the enclosure was always high at 90-95% and even 100% and 1 or 2 fans always keep failing..

Troubleshooting done before we wanted to replace midplane:

1. We update ILO firmware that did't help
2. replace fans couple of times and that failed too
3.change HP power settings that did't help

So last option the next step was to replace mid-plane..

We had about 150 VM's but fortunately we had a other ESX host on the cluster on different chassis and we moved all the VM's to the host and we had no down time...

Well we started with replacing the mid-plane that was pretty quick but after that none of the Blades started to power up..
So steps done to troubleshoot

1. We did a reset of all the VC Flex modules and that did't help
2. We tried power up the blades and still not luck.


so we decided to move the blade to a different enclosure then we tried powering up and i was able to power it on.. then we where confident that its VC issue..


Seeing that we said oh man looks like VC database is gone...


After some research we say link on HP website and said to our self what a miss... it says that we need to put back the old serial number of midplane so that VC can see the enclosure settings.. well the article made sense..

So we removed all the blades out, removed all the VC Flex modules and opened a Putty session to Active on-board administrator.. and run the following command
SET ENCLOSURE SERIAL_NUMBER

and then we put back the active VC Flex module and went to Management Console and said

1. Create a new VC domain
2.  In the Next screen  say  to repair the VC database with  changed OA module
click yes..

that's all it started to repair the VC database and all the settings started to come all..

The good part of all these is i took a VC database backup before we proceed with change.. so even though it was a mess we were confident that anything mess up we can recovery it using the restore....


So the big lesson learned is always check all possible scenarios .. it does't matter how small the change is we should always think about the worst possible scenario and always take good backups...

Till i encounter the next issue you all have a good day..


Wednesday, May 7, 2014

Vmtool Uninstall/Reinstall on Registry windows 2003

Vmtool Uninstall/Install on Windows 2003
Summary

i) If you are unable to upgrade or Uninstall Vmtools in Windows 2003.


ii)Unable to remove Vmtools from Add/Remove programs.


You can perform the following step to install Vmtools.

Note:
Before uninstall please take backup of Registry for safer side.

1. Log in to Virtual Machine which having VMtools issues.

Windows 2003 virtual machines
  1. Start the virtual machine and log on as the Administrator.
  2. Open the Windows Registry editor. Click Start > Run, type regedit, and press Enter.
  3. Delete these registry keys if they exist:
    • HKEY_CLASSES_ROOT\Installer\Features\005014B32081E884E91FB41199E24004
    • HKEY_CLASSES_ROOT\Installer\Products\005014B32081E884E91FB41199E24004
    • HKEY_LOCAL_MACHINE\SOFTWARE\Classes\Installer\Features\005014B32081E884E91FB41199E24004
    • HKEY_LOCAL_MACHINE\SOFTWARE\Classes\Installer\Products\005014B32081E884E91FB41199E24004
    • HKEY_LOCAL_MACHINE\SOFTWARE\Microsoft\Windows\CurrentVersion\Installer\UserData\S-1-5-18\Components\0B150AC107B12D11A9DD0006794C4E25
    • HKEY_LOCAL_MACHINE\SOFTWARE\Microsoft\Windows\CurrentVersion\Uninstall\{3B410500-1802-488E-9EF1-4B11992E0440}
    • HKEY_LOCAL_MACHINE\SOFTWARE\VMware, Inc.
  4. Some services might need to be removed manually from the registry. Delete these as well if they exist:
    • HKEY_LOCAL_MACHINE\SYSTEM\CurrentControlSet\Services\VMTools
    • HKEY_LOCAL_MACHINE\SYSTEM\CurrentControlSet\Services\VMUpgradeHelper
    • HKEY_LOCAL_MACHINE\SYSTEM\CurrentControlSet\Services\VMware Physical Disk Helper Service
    • HKEY_LOCAL_MACHINE\SYSTEM\CurrentControlSet\Services\vmvss
6. Reboot the Server
7. Go to Vmware Console and Start installing Vmware tools.


8.Once installation is completed reboot the servers
9. To check the Status of Vmtools whether installed properly or not go to Vm summary you can find it..


REMOTE DESKTOP CONNECTION ERROR, AFTER 2 ACTIVE SESSIONS

Good day All,
The other day when i was working a colleague of mine pulled me and showed me a Server when tried to RDP was showing the below error...


So he started to ping  and there was ping response and he even tried with file share and it was working fine too.. So he determined that Server is online.. so he logged on to Server via ILO and he saw server is health and online..So he used the console and logged in..

He poked around could't find any problem still he was not able to RDP to server.. so he disconnected all the RDP sessions which were active and disconnected state and boom RDP started to work...
now that puzzled me too why after disconnecting sessions we were able to RDP ??????

Well now i had to replicate the issue .. So i took 2 RDP Session to same server and when i tried the 3 RDP session boom i got the same error, usually if you try a 3 rd session it should still open a connection and pop us with message saying if you want to disconnect any active user session, but this is strange as it was not going that far just failing with error "THIS COMPUTER CAN'T CONNECT TO THE REMOTE COMPUTER"

So first thing i opened was Remote desktop Host configuration mmc..  and checked the connections properties..


well i did't notice anything strange so next thing was checking the local group policy and local security policy and that was looking good too..
So i power on my lab VM and started to check the connection settings.. it was all the same.. so i said let me delete the RDP listener and re-create it again.. so I deleted the RDP-Tcp connection on my lab VM and started the new connection wizard..


So when i came to this option i kind of stopped and said wait a mint let me check something on the registry...

So browsed to below path in registry

HKEY_LOCAL_MACHINE\SYSTEM\CurrentControlSet\Control\Terminal Server\WinStations\RDP-Tcp

MaxInstanceCount=dword::00000002

strange.. so looks like some one when creating the listener instead of choosing concurrent "Unlimited connections"  selected the connections to 2 which was restricting any connections more than 2 sessions..


So changed the registry settings as below and that fixed the issue...

MaxInstanceCount=dword:ffffffff   - unlimited current connections


Hope this helps someone... thanks for reading through.. and have a good day...