Thursday, April 6, 2017

MSTSC - need to see RDP screen and punching username and password

Good day All,

Welcome back!!! recently i was pulled to a little issue for RDP and found it interesting so thought to share to all.

The requirement was user had a JumpServer in TestEU domain and trying to RDP to a Server in TestUS domain.

So after connecting to TestEU domain when they launch mstsc and punch in the username and password for TestUS domain, it will take sometime and through error saying "Directory Logon Failure: bad credentials supplied"

1. Firewall ports was verified nothing blocking
2.Telnet on port 3389 from TestEU domain was working to a Server in TestUS domain

This is when i was called to check, it took time to understand why they doing double hop and  i was able to tell them that this error is in RDP Client.

As we all know when RDP client version before 7.0  you will see RDP desktop first and then ask for credentials but after 7.0 as you soon as you hit connect it will ask for username and password and it will do the authentication process and it will take right you in the Server.

So what was happening when user is trying from a Jump Server in TestEU, even though he explicit provides TestUS domain name ,username and password the username and password are was checked against the current domain and getting that bad credentials error.

Why it does please google it because of single sign-on and registry it keeps validating the user name and password in current domain.

Work around:

1. Start, run , type mstsc and click options and remove any ip under Computer
2. In mstsc  under connection settings click saveas on the desktop and it will get saved as default.rdp and close the mstsc
3. Now open a notepad and click open , select all files and open default.rdp and click ok
4. Scroll all the way down and add the following 2 below in the notepad and save it.
enablecredsspsupport:i:0
authentication level:i:0
5. Now asked them to double click the default.rdp on the desktop, type in the ip and see , does it open a RDP screen of windows 2012 to punch in domain name,user name and password.

Note: If you have a RDP client version 7 and below you would have never encountered this error because when you click mstsc and hit connect it will open a RDP session allowing to punch in username and password.

Hopefully this will help some and until next one you all have a good day!!!!!!!!!!!!!!!!!!!!!!!!!!!!!!

Blade NIC showing unplugged

Good day All,

Welcome back!!!  Couple of weeks ago we had a interesting incident so thought of sharing to all so that it helps someone.
We got a alert ticket and one of the Production Server lost both Production Team NIC's on a blade and was unreachable , strange is we had NIC's for Backup and Management both are up and online.

So troubleshooting steps we performed but issue didn't get resolved:

1.We updated to latest drivers didn't work
2.Replaced NICs didn't work
3.Replaced mother board didn't work
4.Removed blade and put in next slot didn't work
5.Removed blade and put in second half of slot(bay 14) that didn't work too
6. We tried created new profile nope that didn't help


Solution:


 We created a internal only network and then assigned 1 NIC and then on  other Blade Server we assigned a NIC to same Internal network , assigned a 192.168.1.1 and 1.2 IP and pinged both NIC's it started to work.
Now we know that its not NIC issue as when we configured internally network its pinging between both blades.

So finally what we decided was to drop the existing VLAN and then just recreated a same VLAN,...Vola.. issue got resolved.
We reached out to Level 2 HPTS guys but they had no idea why something would like fix the issue.
Hopefully this will help someone, until next one you all have good day!!!!!!!!!!!!


Virtual Connect upgrade - Interactive Mode

Good day All,

Welcome back!!! quite busy these days so after a very long time started to write.
We have completed upgrading Virtual Connect to 4.45 so thought of sharing the process and also issues we encountered along the way

Also i have seen people getting confused on what order to follow, we have been doing this for quite sometime and has been very successful

1.Apply ilo Firmware for all the Blades in the enclosure
2.Apply Firmware update for the Physical Blades and if its Windows OS\ESXi apply all the drivers/Firmware as well
3.Apply On-board Administrator Firmware update
4. Last Apply the Virtual Connect Firmware update

Before you do anything backup the Configuration :


Download VCSU Utility:
http://h20564.www2.hpe.com/hpsc/swd/public/detail?swItemId=MTX_5e16cbb76d9e46e891ca04048d

VCSU User Guide:

https://h20566.www2.hpe.com/hpsc/doc/public/display?sp4ts.oid=4144084&docId=emr_na-c04567803&docLocale=en_US

Virtual Connect Firmware download:

http://h20564.www2.hpe.com/hpsc/swd/public/detail?swItemId=MTX_3adcc3c4275f460c8d97cad17e

After you install VCSU, Navigate in start menu and open Virtual Connect Support Utility - Interactive as seen in below screen

Note: If any VC version is less than 4.01 then you need to update to 4.01 first and then to required firmware in our case 4.45

First Step is to run Health Check Report: Open VCSU interactive mode

Please enter action ("help" for list): healthcheck
Please enter Onboard Administrator IP Address: OA Primary IP
Please enter Onboard Administrator Username: Administrator
Please enter Onboard Administrator Password: *************

The target configuration is integrated into a Virtual Connect Domain. Please enter the Virtual Connect Domain administrative user credentials to continue.

User Name: Administrator
Password: *************

A details report will be generated with complete VC Current Firmware list and any issues will be reported.
Make sure to go over it before you start the upgrade steps below

After verifying all at 4.01 then run the steps below to update the Firmware from 4.01 to 4.45
  •  Please enter action ("help" for list): update
  •  Please enter Onboard Administrator IP Address: OA Primary IP
  •    Please enter Onboard Administrator Username: *************
  •    Please enter Onboard Administrator Password: *************
  •    Please enter firmware package location: C:\vc\vcfwall445.bin
  •     Please enter Configuration backup password (Optional):
  •     Please enter Force Update options if any (eg: version,health): health
  •     Please enter VC-Enet module activation order if any (eg: parallel or odd-even or serial or manual. Default: odd-even):hit enter
  •    Please enter VC-FC module activation order if any (eg: parallel or odd-even or serial or manual. Default: serial):hit enter
  •    Please enter the time (in minutes) to wait between activating or rebooting VC-Enet modules (max 60 mins. Default: 0 mins):hit enter
  •    Please enter the time (in minutes) to wait between activating or rebooting VC-FC modules (max 60 mins. Default: 0 mins):hit enter
  •    The target configuration is integrated into a Virtual Connect Domain. Please enter the Virtual Connect Domain administrative user credentials to continue
  •    User Name: ************
  •  Password: *************
After like 40-45 mints you will see notification showing all your VC Modules updated with version you needed.

Issues encountered:

1, if you have critical database or application which can't withstand at-least 10-15 packet drops then make sure the team is aware, we have seen case where there was like at=least 15 packet drops when upgrade
2.Linux Blades if running in older versions of NIC drivers we have see loosing network connection and had to be rebooted
3.If you have ESXi host and VM's running, if NIC's are configured like Active/Standby then when upgrade you will see packet drops

Hopefully this will help someone and until next one all have a good day!!!!!!!!!!!!!!!!

Monday, October 31, 2016

Windows 2003 SAN Migration from one storage to another.

Good day!

Welcome back!!! and Happy Diwali to all!!!

Recently we had a request to migration SAN from existing storage to a new Storage.As the SAN was pretty old SAN level migration didn't work and we manually had to do xcopy.

If anyone thinks this is pretty easy well to be frank nope, lot of risk involved with no support from MS and also remember drive details are in registry in the form of Signature, so if you change drive letter like we do in Windows 2008 and expect Cluster disk to come online it will fail.

Prerequisites before you start:

1.Take Full Back of both the Nodes
2.Take Registry backup on both the Nodes
3.Take System state backup for both the Nodes.
Note: if anyone things taking system state backup can we restore a Windows 2003, well absolutely and we have done it 2 times successful.
4. Make sure you have the password for Cluster Service account it is set under.Usually 2003 cluster are always set under Service accounts.
5. Make sure you have 2003 resource toolkit is installed and navigate to make sure you can see Clusterrecovery.exe under C:\program files\Windows Resource Kits\Tools.

Steps to perform:

Note: All these steps should be performed by login in on the Node with Cluster Service Account.
If your security doesn't allow to login using the Service Account then make sure you have ID which is part of Local Administrative group before you proceed.

1. Request storage team to assign Luns to both nodes
2. On confirmation that you can see the disk on all Nodes,Shutdown the passive node
3. Format the disk on the active node and assign a drive letter
4. Go to Cluster Admin, right click and add a disk resource and give some dummy name and select the defaults and click and select the new Formatted drive letter and finish it.
5. Bring the disk online and then power on the passive node online
6.Try failing over the disk to another node to make sure you can see the disk on the other node as well.
7. Make sure you do some read/write operations on the disk on the node which is active and confirm that the same can be seen on the other Node.
8. After confirmation disk looks good then perform the xopy from Source to destination disk and after completion make sure all the contents and folders are the same as Source disk.

Command we used:

xcopy Source_drive: destination_drive: /e/v/c/h/k/o/y

9. Now navigate to the clusterrecovery.exe and run it.It will ask you to connect to Cluster, in-case you have stopped the cluster make sure its running and online.After connecting when click next you will see a window asking if you want to replace a disk,Click next and in the final window you need to select Source disk and destination disk what you want to replace it with and Click Finish.
10.What this tool will do is update registry signature of the new disk.
11. Now if you open cluster admin, you will see that new Disk is renamed with the drive letter the old disk had and the old disk is commented as lost.
12. Right click the lost disk in clusteradmin and delete it.
13. Go to disk management and remove the drive letter Q to old disk and change the new Disk to Q.If you get a warning saying reboot is needed to take effect just say ok and be patient it will take sometime and then will show Q assigned to new SAN disk.
14.Verify in Cluster, try failing over to see if Q works fine and both nodes.
15. Last just reboot both the nodes and finally node fail over testing
16. We did 2 Clusters and above steps worked both the time.

The disk we performed had Shared drive, no issue reported after disk replacement and even shares showed up just fine.
Quorum was replaced that worked with no issues.
On google some reported disk signatures issues and had to do some registry fix etc was so not sure under what scenarios, but the steps above is what i have followed and was successful to migrate close to 6 drives.

Hopefully this will help someone, until next one you all have good day!!!!!!!!!!!!

Friday, October 14, 2016

Roaming Profiles, Terminal Server Profiles and Profile Versions

Good day All,

Welcome back, it been some time i did my last posting.. quite busy these days with so many things going on..

We are in the process of rolling out Folder Redirection for our Citrix users so during the process i had lot of confusions on Roaming profile and Terminal Server profile which loads when and why there are different version etc....

So i did some homework and thought to share the same so it may help someone else too..

Please the the screenshot below not sure how many of them understood


Let me tell you i didn't understand fully either and started to try different combinations to really understand this chart.

Before i post the result, the question why would you care??? well if you one of those users you need to implement Citrix UPM or Roaming Profiles Or if you introducing Windows 2012 R2 or Windows 2016 Citrix App Servers then yes you should have this knowledge because if no proper care taken you will hear lot of Profile corruption and also document missing in Profile issues.

How do we avoid it, well you should look at introducing folder redirection , that way Users My documents, desktop etc move along with User on any version of Windows they log in


Roaming Profile set for a User when logs on Windows 7:

A user when logs to a Windows 7 desktop/laptop gets a V2 profile created.

Roaming Profile set for a User when logs  on Windows 10:

A user when logs to a Windows 10 desktop/laptop gets a V5 profile created.


Roaming Profile V2 user logs to Windows 10 desktop/laptop:

A V2 Roaming Profile user when logs to a Windows 10 desktop/laptop then a new V5 profile will be created


Roaming Profile V5 user logs to Windows 7 desktop/laptop:

A V5 Roaming Profile user when logs to a Windows 7 desktop/laptop then a new V2 profile will be created


Roaming profile user on Windows 7 and launching Citrix\RDP on 2008\2012:


A V2 roaming profile user when launches Citrix or RDP on Windows 2008\2012 then same V2 profile will be loaded when no hotfix and registry changes are done.

A V2 roaming profile user when launches Citrix or RDP on Windows 2012 R2 then  V4 profile will be created if hotfix installed and registry changes are done.


Roaming profile user on Windows 10 and launching Citrix\RDP on 2008\2012:

Roaming Profile user on Windows 10 will have a V5 profile, so when he launches Citrix or RDP on Windows 2008\2012 then V2 profile will be created and loaded when no hotfix and registry changes are done.

A V5 roaming profile user when launches Citrix or RDP on Windows 2012 R2 then  V4 profile will be created and loaded if hotfix installed and registry changes are done.


Roaming Profile with TS Profile:

A V2 roaming Profile user if TS profile is attached then when launching Citrix or RDP on Windows 2008 then a new V2 TS profile will be created and loaded

A V2 roaming Profile user if TS profile is attached then when launching Citrix or RDP on Windows 2012 then a new V4 TS profile will be created if hotfix is installed and registry change are done.

A V5 roaming Profile user if TS Profile is attached then when launching Citrix or RDP on Windows 2008 then a new V2 profile will be created and loaded

A V5 roaming Profile user if TS profile is attached then when launching Citrix or RDP on Windows 2012 then a new V4 TS profile will be created and loaded if hotfix is installed and registry change are done.


Only TS Profile :

A new User with TS profile configured logs to a Citrix or RDP on Windows 2008 , then V2 profile will be created

A new User with TS profile configured logs to a Citrix or RDP on Windows 2012 , then V4 profile will be created if hotfix is installed and registry change is done ,if not it will search for any exsisting V2 profile to load or Will create a new V2 profile and will load.


Hotfix links:

Windows 8/Server 2012 (KB 2887239)
Windows 8.1/Server 2012 R2 (KB 2887595)

Registry Changes:

  1. Locate and then tap or click the following registry subkey: 
    HKEY_LOCAL_MACHINE\System\CurrentControlset\Services\ProfSvc\Parameters
  2. On the Edit menu, point to New, and then tap or click DWORD Value.
  3. Type UseProfilePathExtensionVersion. 
  4. Press and hold or right-click UseProfilePathExtensionVersion, and then tap or click Modify.
  5. In the Value data box, type 1, and then tap or click OK.
  6. Exit Registry Editor
Last Step: Make sure to reboot the Server. If anyone has question on which Server you going to do? well all the Server where you will RDP or Citrix App will be published .

I wanted to end with a example let say we have a new User, Roaming Profile has been set and the requirement is he will log to Windows 7 laptop, Windows 10 laptop and also will launch Citrix Application on Windows 2008, Windows 2012 how many profile will get created????? if hotfix and registry change is done on Windows 2012

If anyone say 3 then yup you got the concept right.. let me elaborate..

When User logs to Windows 7 he will get a V2 profile.
When the same User logs to Windows 10 he will get a V5 Profile
Same user When launch Citrix App on Windows 2008 then already created V2 profile will load.
Same user When launch Citrix App on Windows 2012 then new V4 profile will be created and loaded.

Hopefully this help some, until next one you all have a good day!!!!!!!!!!!!!!!!!!!!!!!!


Tuesday, September 20, 2016

Convert to .PFX certificate for Windows if you receive Server certificate (.crt) and Private key(.key)

Good day All,

Welcome back!!! We had a request to apply SSL for a website during the conversation it was suppose to be applied at F5 Load Balancer so the LB team took care of generating the certificate.

Little later client requirement changed and it was decided that SSL should be applied at Windows Web server and not on Load balancer and it should just redirect the traffic to web server.

So the LB team sent me the Certificate file which is .crt and a very confidential file is the .key file which has the private key for the certificate was sent only to authorized people.

Now i had to find a way to merge both so that i can generate a web server certificate with Privatekey embed.

Follow the below steps:

1.Got to following link https://slproweb.com/products/Win32OpenSSL.html and download either 32 bit or 64 depending on the OS


2. Its simple next,next installer and then you will see a folder called C:\OpenSSL-Win64 depending on which version you installed

3. Copy the .cert and .key file to following location C:\OpenSSL-Win64\bin

4.Open a Command Prompt with Administrative rights and change path to C:\OpenSSL-Win64\bin and run command as below in screen shot


Format of Certificate should be pkcs12
Dummy name to export the certificate as PFX
Private key path
Server certificate path
Friendly name
When you hit enter it will ask you set a password, remember that password or make a note if it..
After verifying then you will see that there is a file with .pfx extension generated as below


5. Now open certificate.MMC and import the .pfx and note during the import it will ask for the password you set during Step 4.


Enable the checkbox which says this key as exportable , in case for future use you want to export the certificate from certificate.mmc store.

6. Now open the certificate under personnel store and you will see now that the Server certificate has private key.


Let's assume you want to do vice versa that is you have .PFX certificate and you want to extract Private key(.key) for say Load balancer either F5 or Netscaller then you will have to follow the below steps


Import password is the password for the pfx
Enter Pem pass phrase is just a some password you will have to give

Note: the reason we have to do rsa temp key to private key is that it's observer without rsa command some spaces are in the key which when added to load balancer will through error.


The steps above helped and hopefully this will help someone too!!!!
Until next one all have great day!!!!!!!!!!!!!!!!!!!!!!!!!!!!!!!!!

Sunday, September 18, 2016

SSL on 2 Node Storefront 3.6 Load Balancing Servers

Good day All,

Welcome back!!!

We got a request to apply SSL to Storefront Servers recently even for internal users and also add 1 more Server for Load balancing .The current Setup we had was 1 Node Storefront Server with 2.x version running on it

Below are the steps we followed to fulfill the request

Step 1. We add a new Storefront Server with same 2.x version and added the Server to Load balancer. The steps are pretty straight forward..

a.Installed Storefront on the new node
b.Go to primary node, Click Add Server under Server Group in Citrix Storefront MMC and it will show a Authorization code as below


c. Login to new Secondary Storefront Server and click join to Storefront farm in welcome screen when you open Citrix Storefront MMC and then type in the Primary Node Server name and Authorization code , OLA the Server is added to Load Balancer
c. Requested a new Virtual IP(VIP) from F5 Load Balancer team and it was configured to Load Balance traffic on port 80 between both Storefront Servers.
d. Last step was to update the DNS record as it was earlier 1 node and it was pointing to the Primary Storefront Server IP. So we changed the DNS record to point to F5 Load Balancer VIP


Step 2: We wanted to upgrade the Storefront Servers from 2.x to 3.6 before we apply SSL. If you have a huge user base and can't afford to have users downtime for very long time then you probably will have to make sure you involve Load Balancer team during the upgrade process

a. Request Load Balancing team to remove Primary Server from Load Balancing.
b. Download the Setup and run the upgrade, simple straight forward upgrade.
c.After testing upgrade , add the upgraded Server to Load Balancing and remove the old Server from it
d.Upgrade the Secondary node
e.Request Load Balancing team add the other Server

As we had required downtime we didn't involve Load Balancer team and Servers was upgraded 1 Node at a time.

Step 3: Final step was to apply SSL on both the Storefront Servers.
As our requirement was to apply SSL for internal users we wanted to have the SSL traffic get terminated at Storefront Servers and not at F5 Load Balancer. Also we wanted if any users types in url then it should get auto redirected to 443 traffic and send to Storefront Servers.

a. A certificate was requested .Generating certificate etc are pretty straight forward process and there are so many articles out there so will not be covering it.
b.Requested the F5 Load Balancer team to reconfigure the Virtual IP(VIP) so that HTTP to HTTPS redirection works and HTTPS traffic is sent to both Storefront Servers.
c. Certificate as uploaded to Certificate.MMC store and also root and Intermediate Certificate was added to both Storefront Servers.
c.On both Citrix Storefront Servers under IIS, new binding was added for 443 as below under Default website and under the tab which says SSL Certificate , the certificate we processed earlier was pointed and applied.


d.Same steps as above needs to be done on the other node as well.
e. last Step was under Primary  Citrix Storefront Server MMC, right click Server Group and click change Base URL and change the record from HTTP to HTTPS
f. During the testing we started to see the below error when we browsed the URL.


Troubleshooting Steps performed:

1. We know that before we applied SSL storefront was working fine so to identify if this error is on both nodes or 1 single node , so i went ahead and shutdown Secondary Server.
2. When tested, Storefront was working fine and we able to browse the Apps.
3. So this time i powered off Primary and brought online Secondary, now we Started to see the same error. Now i know the issue is with Secondary node. As we had load balancer sending traffic to both SF Servers so we seeing the above error when we hinting the Secondary node.
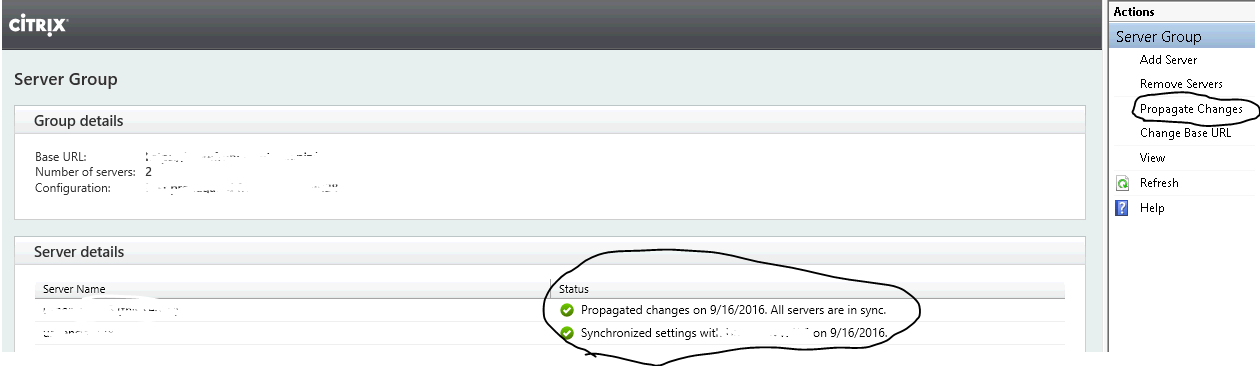
4. To fix the issue i brought the primary node online and went to Server group and started to check around.
5. Anyone any guess? what would be the fix? well guess what when i checked the Last Synchronization time it was showing couple of days ago, so clicked under Actions to propagate changes to all the other Nodes, and ola the issued got fixed.


To make sure we do a through testing , following things was tested

1. Primary Node was shutdown and Secondary Node was tested with Node IP, Load Balancer IP and HTTPS and application was tested.
2. Vise versa was tested
3. Last step was both Servers was brought online and tested both Servers with IP, VIP IP,HTTPS.

So this is how we completed this request, hopefully this helps someone...........

Until next one you all have great day!!!!!!!!!!!!!!!!!!!!!!!!!!!!!!!!!!!!!!!!!!!!!!!