Monday, February 29, 2016

Windows Boot Process

Good day All,
Welcome back!!!
I am not going to take credit for this screen shot just took it from Microsoft Virtual academy course, check it out if need to learn more.

Just putting them together so that we can have this handy when trying to troubleshoot a Windows boot issue to understand which part of the process may be failing..


Various process that gets loaded during the boot process:


If anyone really wants to learn more on each phase of boot process and also various memory Management terms best book to have handy is System Internals 2 Part series, excellent books to have it in your store.
Hope this helps someone, until next one you all have good day!!!

Tuesday, February 23, 2016

Event Log - High CPU

Good day All,

Welcome back!!!

Today we will go over how we recently troubleshooted high CPU issue.

The OS issue reported was Windows 2012


As soon we see the task manager we can say that WMI is the issue and we started to look around how to fix WMI.

We ran couple of commands for WMI and it was all good and none of the articles for WMI issue reported applicable to Windows 2012.

So first thing we did was as Service host was common for 4 Service including WMI, we  separated them and so that Wmi can have it's own Service host using the below command.

sc config winmgmt type= own

Not sure how many of them know what is xperf? if not please google .. handy little tool to troubleshoot lot of Windows performance issue.
So i ran xperf for like 10 mints captured high cpu and when i check for wmi process this is what i see...


Wmi calling the Service host with PID 724 , this Service host if consuming lot of CPU and intent its spiking the wmi.

So we need to find out what Service are involved in this Service host, and which is spiking it..

this is where Resource Monitor showed his magic


So when i clicked the Svchost i could clearly see that Event log Service which is using the same process is Spiking for high CPU.

Now started to wonder Event log? we couldn't disable it to check it so i started to take a look at all the event logs, first thing i did was cleared all the logs and saved them and started to monitor,,

When i checked the Security logs it was filled in just 2 sec 120 MB, i was puzzled so cleared one more time and checked again.. same thing So now i understood lot of alerts are been generated, security log is getting filled and then after its filled it clearing the old logs and over riding and so the whole process is consuming lot of CPU.

So when i started to check the eventlog i see lot of event id 4663, which is basically telling that some is writing to a folder and that is getting audited.
Well now we know what is been audited, checked group policy to see if Audit object Access was enabled and sure it was...

As soon as we moved the Computer object from the OU having this group policy, CPU spike dropped down and everything went to Normal.

We have close to 1000 Servers in the OU why one Particular Server had this group policy issue is still to be investigate...
If anyone have thoughts welcome to share...

Hope this helps someone and until next one all have a good day!!!!

Wednesday, February 17, 2016

Nano Servers- 2 Node Hyper V Cluster

Good day All,

Welcome back!!!

I have been playing with Nano Servers, so thought of creating a Hyper V cluster see how it goes.. Not much of challenges but couple of little hurdles will share it .

Anyone missed how to create  your First Nano Server, please check my post


Lab: Created 2 Nano Servers with Hyper V roles, Installed Failover Clustering Feature.

NANO2016A : 192.168.1.42
NANO2016B : 192.168.1.43
NANHYPVERV: 192.168.1.44 - Cluster Name


1. You can't run Cluster Validation of Nano Servers from Windows 2012 R2 Server, you will need a Windows 2016 installed. So i have a VM with Windows 2016 installed


Note: I got couple of warnings because Firewall is disabled on both Nodes and also there is not Private heart beat network and no teaming for Prod nic as well.

2.
Provided the Cluster name and IP


3. This was simple, Cluster formed ..


4. if you noticed Quorum Settings its showing the Witness as None that is because there is no Witness disk , so how did Cluster get created????


if you have not heard of dynamic quorum in Windows 2012, then you should check out the below articles.. which goes over what is dynamic quorum, what is Node weight and how it is been playing under the hood to keep the cluster alive

https://www.petri.com/what-is-windows-server-2012-r2-dynamic-quorum
https://technet.microsoft.com/en-in/library/jj612870.aspx

Unless you didn't go over the above two articles you may not understand the Current Vote below


Note: If you like to change the quorum settings then you can change to File Share Witness if required, but i have left it like this

5.
 If you ready to create Virtual Machines, but how as i have already created a Windows 2012R2 Scale Out File Server i will use the same share to Store VM's .

First thing we need to do is give Full permission to below ID's on the share

Nano Servers Computer Account
Administrator who is going to manage the HyperV
System Account


As i told before we have launched Failover Manager on a Window 2016 and created  the Hyper V  cluster right? so now why i use the wizard to create the Virtual Machine i started to get the below errors


The reason we seeing this because we are running Failover Manager from a Windows 2016 Server so its checking for delegation for the Nano Servers on the file share, more information on Why we need delegation check the below link

http://blogs.msdn.com/b/taylorb/archive/2012/03/20/enabling-hyper-v-remote-management-configuring-constrained-delegation-for-smb-and-highly-available-smb.aspx

if you your forest functional level is 2012 then you follow the steps in below article

http://www.thomasmaurer.ch/2014/02/hyper-v-over-smb-set-smb-constrained-delegation-via-powershell/

After enabling delegation wait for sometime before you start creating, i have seeing setting taking time like 10mints not sure why :)

Now you should be able to create your Virtual Machine on Nano Hyper v Cluster and do Live Migration.


As this is still Technical Preview i would think MS would do lot of modifications before final release.

As i keep testing will either update the same blog or will post new one .. hopefully this helps someone and until next on you all have a good day!!!

Sunday, February 14, 2016

Replacing a disk in 2 Node Windows 2008 R2 SP1 Cluster

Good day All,

Welcome back!!!

We had a requirement to replace a GPT formatted disk which had Oracle Database file to a new disk MBR formatted and files needed to be copied over, so this is what the steps we followed

1. All Application was shutdown
2.All the resources in the cluster was brought down in Failover Cluster Manager
3.Right click the GPT disk online ex drive letter is S
4.Requested same size new LUN to be presented by SAN team
5.Formatted the disk with MBR and assigned a drive letter ex Z
Note: the new LUN Z shouldn't be added to Cluster yet.
6.Used xcopy to copy over the Database file from S to Z
xcopy s: z: /e/v/c/h/k/o/y
7.Now take the old LUN S offline
8.Got to cluster group where the S drive is present, right click , click more action and click Repair
9.You will see a pop up window showing the new LUN Z
10 select it and click ok, Cluster will do the magic of disk signature updating etc and it will say updated .click ok and that's it.
11. Right click the disk and bring it online, you will see that old drive letter Z is still present.So click change drive letter and update to S and take the disk offline
12. Now go to Storage group, Click Add disk and you will see the old GPT formatted disk in there, select it and add to Cluster.When you refresh you will see that drive letter is still showing as S, so rename that to Z.
13. Now go to the cluster group , bring the S drive online and then bring all the resources online and test the failover.
14. If you need  Z drive to be reclaimed by storage team then delete the disk from Cluster, go to disk management right click bring the disk online, remove the drive letter and take it offline and ask the Storage team to reclaim it.

Hope this helps someone and until next one you all have good day!!!!

Thursday, February 11, 2016

Nano Servers - MS answer to VMware ESxi

Good day All,

Welcome back!!!

Windows 2008 gave birth to Server core a small footprint of Windows 2008 OS and with Windows 2012 we where able to move from Server Core to Minimal Server Interface to Full GUI Windows 2012.
With Windows 2016 MS gave birth to Nano Servers a small footprint of a Windows OS,VM guys can say it as similar to ESXi but we all will be surprised to see a Windows OS just about 700MB, so hard to believe it right? :)

see the below screen shot to believe it - Probably the max size i would say.. i have included almost all Roles and Features. If this Nano Server serve has only DNS or Hyperv or Clustering probably image size would be around 600 MB


Lets go over the steps to setup you first Nano Servers:

1. Mount your Windows 2016 Technical Preview 4 ISO
2.Copy the contents from folder named NanoServer on to some drive , Lets say C:\Nanoserver

3. Open Powershell in Administrator Mode and run the following Commands


Set-ExecutionPolicy -ExecutionPolicy Unrestricted -Force -Confirm:$false

Change the Path to the foler you copied that nanoserver scripts from ISO.

Import-Module .\nanoServerImageGenerator.psm1 -verbose


New-NanoServerImage -MediaPath H:\ -BasePath .\Base -TargetPath C:\NanoServer\NANO2016A.vhd -ComputerName NANO2016A -OEMDrivers –Compute -Clustering -Storage

Note: The below screen shot taken from MS article tells in detail what are the various Roles and Features you can add to a Nano Server.


Note: H drive is where my Windows 2016 ISO mounted.


when done you will see a vhd in the location targetpath you specified, in my case its c:\NanoServer

update the vhd with Guest drivers too for Hyper v

Edit-NanoServerImage -BasePath .\Base -TargetPath C:\NanoServer\NANO2016A.vhd -GuestDrivers


4. Create a Virtual machine and attach the vhd you just created and boot it up..

well this was easy :)


Type your username and password and press Enter


Assign a static IP:

Edit-NanoServerImage -BasePath .\Base -TargetPath C:\NanoServer\NANO2016A.vhd -InterfaceNameOrIndex Ethernet -Ipv4Address 192.168.1.42 -Ipv4SubnetMask 255.255.255.0 -Ipv4Gateway 192.168.1.1

Now try pinging your First Nano Server


5.
We have couple of way to manage the Nano Server, i will show you how to access the Nano Server using pssession

Open the Power Shell as Administrator and run the following commands

net start winrm
Set-Item WSMan:\localhost\client\trustedhosts "192.168.1.42"


Enter-PSSession -ComputerName 192.168.1.42 -Credential nano2016a\Administrator


If you see the below error when trying to connect pssession for a nano Server then that mens that you have not added that IP of nano server to trusted hosts for Windows Remote Management.
run Set-item command for that IP and then try the pssession.
The example below i had a Nano Server named nano2016b IP: 192.168.1.43 not added to trusted.


So we have successfully logged in to Nano Server using PSSESSION

6.
To disable Windows firewall you can run the following commands in pssession

NetSh Advfirewall set allprofiles state off
net stop mpssvc
set-service -name "MpsSvc" -ComputerName -Status stopped -startuptype disabled


7.
Adding a DNS IP :


Get-DnsclientServeraddress - will list all the NIc's Server address
Set-dnsclientserveraddress -InterfaceIndex 3 -Serveraddress ("192.168.1.20")
or
Set-dnsclientserveraddress -InterfaceAlias "Ethernet" -ServerAddress '192.168.1.20'

8. Adding Nano Server to Domain:

Follow the below steps if you don't have any Hyper V Server already in Domain:

a. login to any Windows 2012 R2 domain join Server
b. Run the below command
djoin /provision /domain vlab.com /machine nano2016a /savefile c:\nano2016b.txt
you will see a text file been created


If you see the AD now there will be Computer object with nano2016b pre-created.


c.
Map a drive to your Nano Server and copy the nano2016b,txt file

d.
Now enter the Nano Server using PS-Session and verify that txt file exists


run the following command:

djoin /requestODJ /loadfile c:\nano2016b.txt /windowspath c:\windows /localos


We have successfully add the Nano Server to domain, before you test make sure to reboot the Server.


Note:
If you don't update DNS details before joining to domain then DNS A record will not be created , then you will be to run the set-dns command and then do flush and register dns.


9.Follow the below steps to add Nano Server to domain  if you have any Hyper V Server already in Domain

New-NanoServerImage -MediaPath D:\ -BasePath .\Base2 -TargetPath C:\NanoServer\Test3 -ComputerName Test3 -GuestDrivers -Compute -Clustering -InterfaceNameOrIndex Ethernet -Ipv4Address 192.168.1.53 -Ipv4SubnetMask 255.255.255.0 -Ipv4Gateway 192.168.1.1 -DomainName vlab.com

So this will create a New VHD, assign IP and then add to domain as well...


Note: Please make sure to Set the DNS IP Address and do the registerdns to have a host record created in DNS.
10.
 Disable IP6 if you need so:

Disable-NetAdapterBinding -InterfaceAlias "Ethernet" -ComponentID ms_tcpip6

11. if you seeing this error after adding to domain but unable to login with domain ID then probably you would have forgot to update the DNS, so add the DNS using set-dns, then flushdns and registerdns. Make sure you doing it by logging to nano server using psssession.


For more information you can take a look at this below MS article,

https://msdn.microsoft.com/en-us/library/mt126167.aspx

After playing for sometime it was easy to setup and move around.. but we should start brushing our Powershell knowledge if not done already as this is will be a must if you have to support Nano Servers.
Hopefully this helps someone!!! and until next one all have a good day!!!!

Monday, February 8, 2016

Adding Hyper V 2016 Node to exsisting 2 Node Windows 2012 R2 Cluster - Part 3

Good day All,

Welcome back!!!

Before 2016 if you have to move to a new Hyper V Cluster or any other Cluster you will have to evict the Node, rebuild the Server.. create a brand new Cluster and move the resource or copy over the resource..
With Windows 2016 finally MS pulled it off and now we will be able to add a Node to existing cluster and now with No downtime we will be able to migrate to new Windows version of 2016.

As of Technical Preview 4, its possible only from Windows 2012 R2, will  be able to migrate from old versions like 2008,2012 is yet to be unknown but that looks very unlikely.


Some really exciting new Features in Window 2016, i encourage everyone to take a look at below link
https://technet.microsoft.com/en-in/library/dn765472.aspx


Recap of Part 1 and Part 2 Lab:

Scale out File Server:

FooFS1 - 192.168.1.27
FooFS2 - 192.168.1.28
FooFS - 192.168.1.29 - Client Access Point for Accessing the cluster
FOOSHAREVM - client Access Point for Scale out File Server.
\\foosharevm\VMSHARES - File share to store Virtual machines

Hyper V Cluster:

Hyperv2012A - 192.168.1.25
Hyperv2012B - 192.168.1.26
Hypervclus -     192.1681.24


New Node Windows 2016 to be added to existing Hyper V cluster:

Hyperv2016A - 192.168.1.23


As always make sure you have replicated the 2016 Server similar to 2012 R2 Servers in terms of
1. NIC Settings
2.Private Heartbeat
3.Permission to Window 2016 Computer object to access the Scale out File Server


4.If you have Windows Firewall disabled then do it as well
5.Internal Switch settings for VM


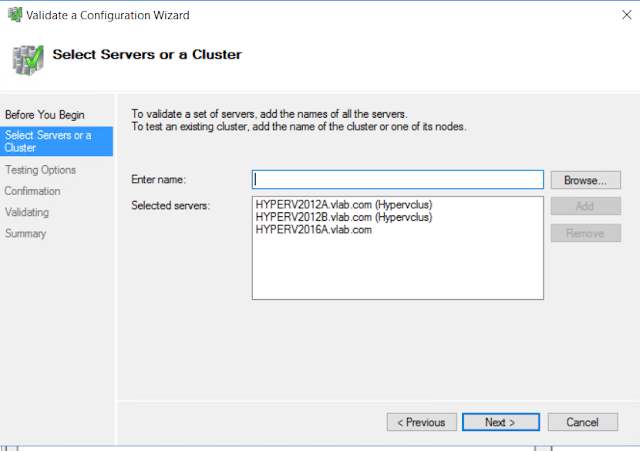
If anything mismatch Cluster Validation will tell us, so lets start with validation


Note:
 All Cluster Validation should be done only in the new Windows 2016 Node.
Also adding of Node to 2012 R2 cluster should be done from Windows 2016 Node. 


Note: If you going to pick Run all test remember to be cautious in production Environment, Storage will be tested as well.
Warnings i know why because i don't have redundancy on NIC's.

I got a failure, if you read through it clearly says that i forgot to create the Virtual switch on the new Windows 2016 Node.


So i fixed the Virtual switch and re-run the validation and this time it run fine.


Adding the Node to existing Cluster:

1. Login in to Windows 2016 Node
2.Make sure both Hyper V, Failover roles and feature is installed
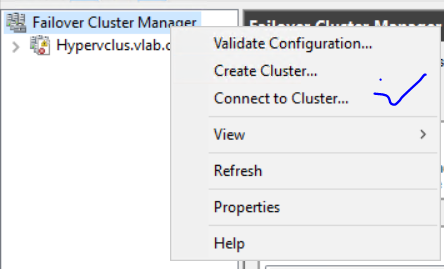
3.Open Failover Manager and connect to Windows 2012 R2 cluster


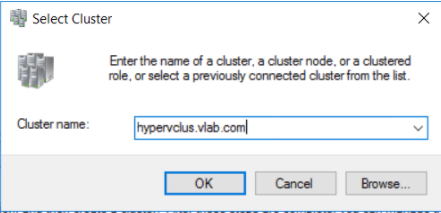
4. Type the Windows 2012 R2 Cluster Name


5. Click Add Node


6. Add the new Windows 2016 Node and click Next


7. That's it you have add the Node to cluster.

Wow finally Rolling upgrades work's in Windows 2016 the feature we all have been waiting for.


8.That was easy!!!


9. Lets do the Live Migration now, worked faultlessly :)


Rolling upgrade is one of the best feature addition in Windows 2016 along with lot of features..

Hope this helps someone and until next one you all have a good day!!!