Wednesday, November 22, 2017

CPU 95% spike alert - resolved!!!!

Good day All,

Welcome back!!!! We had a strange incident for CPU alerts been reported by Client.. our monitoring tool was not showing any high CPU usage but Client as monitoring setup and they are getting CPU spike alerts one or two times in couple of days...

We did routine health check by checking month log CPU usage , CPU was hardly showing 30% spiking for entire month but still Client was getting alert so following steps was performed to further troubelshoot

1. Open resource monitor and started to keep a eye on CPU spike to see which Service is causing it..
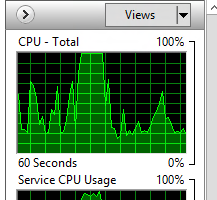
2. After a close watch for like a hr was able to tell that svchost.exe was utilizing it
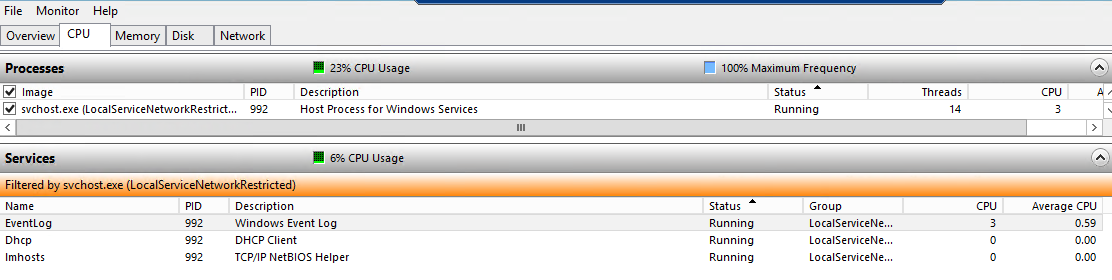
3. As svchost is a shared process had to identity which Service is causing it so enabled the check box next  to Service host in CPU tab of resource montior and monitored as below


4. From the above i was able to identify it was event log Service which is piking the CPU
5.So opened event viewer and started to check the events found that in Security log for every 1 sec at-least 10 to 15 events on Event ID:5156 Platform Filtering Connection was getting generated and filling up the 1 GB security log file in no time. After the log file is filled its trying to over write but number are events are so high its unable to process it and spiking the CPU


6. Verified in local security policy that Audit Object Access policy was enabled for both Success, Failure and it been enforced with GPO.


7. Starting Windows 2008 Audit policy has changed and lot of subcategories are added and you can verify it by typing in command prompt auditpol / get / category


8.Our Security policy was to have both Success and Failure for Filtering Platform Connection, had to raise a exception and policy was changed from Success and Failure to only Failure with the following command on the Server
auditPol /set /Subcategory:"Filtering Platform Connection" /Success:disable /failure:enable

Ola the issue got resolved and we did't see any more spikes....

hopefully this helps someone, until next one you all have a good day!!!!!!!!!!!!!!!!!!!!!!!!!!!!!!!!!!!!!!

Preparing to configure windows - Do not turn off your computer

Good day All,

Welcome back!!! today will share a issue we encountered on a Windows 2008 Server after patching.

After patching when logged into console this is the error we started to see for a very long time


Troubleshooting steps performed

1. rebooted the Server, went to safe mode and try to uninstall installed patches and it showed error and unable to unistall
2.Tried last good configuration that didn't work
3.dism.exe /cleanup-image /scanhealth didnt help

So to fix the issue we reboot the Server and during the above screen did a MMC to check if all Service was running fine or anything is struck in stopping mode.

On verification we found that Antivirus scan was in stopping state , we tried pskill to kill the service but no luck so we changed the service settings to manual and then did a reboot..
Ola we able to login back and then did a windows update, patches got installed and then started the service back..

I have seen across the internet some one saying to remove the pending.xml file under C:\windows\winsxs so just sharing in-case above steps doesn't work for someone.

Hopefully this helps someone, until next one you all have good day!!!!!!!!!!!!!!!!!!!!!!!!!!!!!

Friday, November 17, 2017

Linux Blade after firmware either NIC's disconnected or unable to reboot or power off.

Good day All,

Welcome back!!! recently Unix team started to do firmware upgrade on the blades and after upgrade when to reboot the Servers couple of issues was reported

1. all the NIC cards would be in disconnected state
2. Blade will not respond or will not be able to hard reset or power it off state.

Following steps was performed to fix the issue

1. Reset the blade :

  • Login to OA and make note of the bay the blade is in under. 
  • Now open putty and connect to primary OA IP
  • type reset server bayno. 


ask you to confirm and then it will show successfully done.

2. If resetting the blade fails then login to Virtual connect Manager. Go to profiles and select the blade and click edit.Down below you will see a option to un-assign the profile for the server and click ok.  Now go back to Server and then apply the same profile back and click Apply and power on the blade.

hopefully this helps someone and until next one all have a good day!!!!!!!!!!!!!!!!!!!!!!!!!!!!!!!

Sunday, October 15, 2017

C7000 - decomm 2 C7000 Frames and creating new Domain

Good day All,

Welcome back!!! recently we had a request to decomm 2 C7000 Frames which are part of the 4 Frames Linked Frames.
Kindly note as the decomm is for the Primary frame in the domain we will need to re-create a new domain.

Pre-task to be done:

1. Backup the currect VC domain in case if we have to revert back
2. All Server Profiles complete screen shot showing which NIC is configured on the Server
3. Shared uplink set screen shot showing the ports which are configured to uplink switches.
4. All Ethernet networks information which are associated to all the Shared uplink sets and VLAN's
5. Need to determine if you want to use a old name or a new Name for the domain
6. What would be the IP for the new domain
7. Who will remove the existing cables from 4 frames and how to configure new stacking links only for 2 frames.
8. If direct attached SAN is present all the information needed to recreate should be taken
9. All blade Servers will need to shutdown and we will have to recreate all the Shareuplinks,Ethernet networks and Servers profiles so for the whole activity at-least 12-14 hrs of downtime. We may need more in case we run into issues so plan your downtime well.

Note: All our blades are using the Factory default settings for MAC address so no additional information needed to be captured. If you have to use the domain then need to determine what series will be used for it.


Stacking Links connected requested as below:

Frame 1 Interconnect Slot 1 port 1 Frame 2 Interconnect Slot 1 port 1
Frame 1  Interconnect Slot 2 port 1 Frame 2 Interconnect Slot 2 port 1


During the change Window:

1. Shutdown all the Server blades
2. Login to VC and Un-assigned all the Ethernet networks for each Servers in the profile for all profiles in all 4 frames
3. Deleted all the Ethernet networks on all the frames
4. Deleted all the Shared uplink ports on all the frames.
5. Now click on enclosure and under configuration deleted the 2 Frames which you will be reused to create new domain (Note: delete domain can be done too now )

Note: You will not be able to delete domain or delete a enclosure without blades are been shutdown and Ethernet networks been unassigned in Server profiles and shareuplink sets are deleted.

6. Now request the cabling guy to connect the stacking links and confirm he is done before you proceed

7. Now login to OA for the Primary frame , click on Enclosures IP4 and make sure all the VC IP and ILO for the blades are intact.

Note: if this new domain creation then you will need to configure you OA first with IP for all the VC Modules and ILO for Server blades.

8. Now use the IP for VC1 module and connect ,as soon as you authenticate you will notice that domain configuration wizard will start
First step is to configure domain name .Click next will ask you import the current enclosure module, give the password and hit next and module should be imported and then at the end before  you click finish you see a option to un-check  configure network just un-check it as we will do it later.

9. Now click on Configurations , go to IP Address tab and click use Virtual connect domain IP and provide the VC domain IP,

10. you will notice that current session will be logged out and will be redirect to new VC domain IP

11. Logged back and started creating the Shared uplink Sets. Note that all the uplinks will be in standby mode don't worry after you add ethernet networks and assign to Server profile the uplinks will come online.

12. Now started to create Ethernet networks

13. Created new Server profile and assigned the Ethernet networks for the NIC's as it was before

14. Powered on the blades and the Servers came back online with no issues and no need to reconfigure IP's because we used Factory default of blades so no mac-address got changed even though new Server profile was attached.

15. Completed the creation for all the frames and it was handed over for testing.

So this is how we successfully decommission 2 Frames in the 4 frame domain and recreated a new domain.

How to make sure stacking links are connect properly:

After logging to VC, when you click on Stacking links you will the connecting Status and redundancy status showing all OK.

Also i have see people finding default to understand see below, marked in yellow is the external cable links we requested engineer to connect and if you see the other connections they are just internal wired connections between 2 VC modules which are adjacent to each other in  frame.
Example : Connection from VC1 to VC 2 module

Note: Always make sure that VC modules id more than 1 frame are created as parallel, should never connect cross cabled.


So this is how we successfully completed the request and sharing the same so that it helps someone!!!
Until next one you all have good day!!!!!!!!!!!!!!!!!!!!!!!!!!!

Monday, September 4, 2017

Basic to GPT disk

Good day All,

Welcome back!!! recently we had a request to add additional 1 TB of space to a already existing     1.5 TB of basic disk and its virtual machine.
Lot of guys may be thing what is the issue here and why we need a post for this?
well i have seen still lot of Admins do the mistake of just extending disk beyond 2 TB and struggle to understand why disk is not extending beyond 2 TB,
If you have read my first sentence there is answer to it, well i said this a Basic disk and Basic disk can't be extended beyond 2 TB so we need to convert to either GPT disk or add new disk and make the disk as dynamic.

Dynamic disk : Well even MS does't recommend this on new OS like 2008/2012 and disk performance are not that great.

GPT disk - is the way to go for performance and further growth but we will have to format the drive and restore the data.

After some discussion we decided that as this is File share drive,sighting performance and future growth we decided to go with GPT and wanted to come with a plan so that downtime for this is as minimal as possible.


Pre-Task we performed:

1. Took File share permission screenshots
2.Registry backup was taken as all the file share permission are present in case we have to revert or apply it
3.a New 2.5 TB GPT disk was created and attached to a Server let says name as B in the same ESXi Farm
4.we started a Robocopy batch script with below details from Source Server disk to GPT disk in Server B on the destination Server B.

ROBOCOPY /e /xj /ZB /r:2 /w:5 /LOG+:"C:\Log.txt" /it /purge /copyall Source_Path Destination_Path

@Echo Copying Complete
Pause 

Syntax:
/E :: copy subdirectories, including Empty ones.
/XJ :: eXclude Junction points. (normally included by default).
/ZB :: use restartable mode; if access denied use Backup mode.
 /R:n :: number of Retries on failed copies: default 1 million.
/W:n :: Wait time between retries: default is 30 seconds.
/IT :: Include Tweaked files.
/COPYALL :: COPY ALL file info (equivalent to /COPY:DATSOU)- Includes all Security Permissions.


5. 1.5 TB of data copy took about 15 hrs
6.A day before cutover we did one more incremental Robocopy and synced all the new changes and it took us about 30 mints

Steps performed during the cut-over:

1.Go to shares and close all the open shares for the drive
2.Initiated a Final Sync so that we are not missing new changes, it took about 15 mints
3. Removed the  1.5 TB disk from edit settings on the properties of the VM
4.Removed the 2.5 TB disk from destination VM and noted down the path
5.On the Source Server in edit settings given the new path to 2.5 TB disk
6.went to disk management on the Source Server scanned for new drive.
7.It automatically assigned a new driver letter E
8.So we changed the driver letter from E to original F and all the share permission got applied to drive

I have seen lot of people getting confused, please note Robocopy will only carry Security permission if required all the share permission you will have to manually assign to Shares.

As the registry settings was having all the sharing details as soon as changed the drive letter it took the Share permissions automatically and we didn't had to give anything.

The whole downtime for the post steps was like 45 mints and Server was up.

If anyone has a better way of doing it please share.
So we are at end of this article hopefully this helps someone, until next one you all a good day!!!!!!!!!!!

Friday, September 1, 2017

Unable to change Audit settings in Local group policy even though the settings are not governed by Group policy

Good day!

Welcome back!!! As part of non compliance,our security team asked me to enable below Audit Policy settings for Success/Failure in Local group policy.

Audit system events
Audit process tracking
Audit Policy change
Audit object access

When we try to enable Success/Failure it seams to work and then after we close the settings and go back and recheck the settings get unchecked.

So first think we checked was is it bound by group policy which is not and if its even bound by group policy it will not even allow to change it, we will clearly get error saying can't change it as its been enforced by Group policy.

For starters if you don't know starting 2008 MS introduced Advance Audit settings which you can enable using the Auidtpol command.
Below is the list of Category and subcategory for the Audit

Advance Policy sub category:

Audit system events

Category: System

  Security System Extension            
  System Integrity                    
  IPsec Driver                        
  Other System Events                  
  Security State Change                

Audit process tracking

Category: Detailed Tracking

Sub-Category:

  Process Creation                      
  Process Termination                  
  DPAPI Activity                        
  RPC Events                            
  Plug and Play Events                  

Audit privilege use

Category: Privilege Use

  Non Sensitive Privilege Use          
  Other Privilege Use Events            
  Sensitive Privilege Use              

Audit Policy change

Category: Policy Change

  Authentication Policy Change          
  Authorization Policy Change          
  MPSSVC Rule-Level Policy Change      
  Filtering Platform Policy Change      
  Other Policy Change Events            
  Audit Policy Change                  

Audit object access

Category: Object Access

  File System                          
  Registry                              
  Kernel Object                        
  SAM                                  
  Certification Services                
  Application Generated                
  Handle Manipulation                  
  File Share                            
  Filtering Platform Packet Drop        
  Filtering Platform Connection        
  Other Object Access Events            
  Detailed File Share                  
  Removable Storage                    
  Central Policy Staging                

Audit Logon events

Category: Logon/Logoff

  Logon                                
  Logoff                                
  Account Lockout                      
  IPsec Main Mode                      
  IPsec Quick Mode                      
  IPsec Extended Mode                  
  Special Logon                        
  Other Logon/Logoff Events            
  Network Policy Server                
  User / Device Claims                  


Audit directory service access

Category: DS Access

  Directory Service Changes            
  Directory Service Replication        
  Detailed Directory Service Replication
  Directory Service Access              

Audit account management

Category: Account Management

  User Account Management              
  Computer Account Management          
  Security Group Management            
  Distribution Group Management        
  Application Group Management          
  Other Account Management Events      

Audit account logon events

Category: Account Logon

  Kerberos Service Ticket Operations    
  Other Account Logon Events            
  Kerberos Authentication Service      
  Credential Validation                

How to  enable Category:

Example:

Auditpol /set /category:"Account Logon" /Success:enable /failure:enable
Auditpol /set /category:"Logon/Logoff" /Success:enable /failure:enable


If you don't want to enable all the Audit settings in Category you can enable just the Subcategory

Example:

AuditPol /Set /Subcategory:”Credential Validation” /Success:enable /failure:enable

So if you have to enable Audit policy subcategory you need to enable it as below.


coming back to my issue when i tried to change the settings under Audit Policy it was not allowing me because Advance Policy was enabled and now any settings you will have to enable it by using Auditpol command only.

Problem was our tool from security was only looking at the Audit policy, is settings enabled or not and it had no clue on Advance Audit Subcategory. Even though we had it enable in there it was not working.

So to fix the problem i had to disable the Force audit policy, then enable all the settings in Audit policy and then enable it back.

Hopefully this helps someone and until next one you all have good day!!!!!!!!!!!!!!!!!!!!!!!!!!!!!!!!!!!

Tuesday, August 29, 2017

Blade movement from 1 Frame to another in a linked Frames

Good day All,

Welcome back!!! we had a recent requirement to move a Blade from 1 Frame to another on a Linked Frame of 4 and following steps was performed

Pre-plan:
1. Note ILO IP details
2.If you have to create new Profile then all the NIC's VLAN information needs to be noted.
3.Blade to be verified if its using VC assigned NIC's,WWW N's or Server default and MAC address and WWW N's needs to be noted.
4.Need to make sure VLAN's been used in current Frame, same is already in palace on New frame which means need to verify Ethernet Networks for same VLAN in place.
4. SAN Fabric if present then need to make sure same is present in new frame we well.

Steps Performed:
Note:
Our Frames are old setup that is SAN connected to a MDS Fiber switch to 2 VC modules on Bay 3,4. For starters this setup is  like a physical Server connected to a external Fabric switches just that its internal that's it.
Also the VC profile was setup to use Blade MAC and WWW N's.

1. Source Server was powered down
2. Existing Profile was unassigned
3. ILO IP was unchecked in old frame and assigned in new frame in OA
4. After the move , as the frames are linked assigned the existing profile pointing to new Blade location in the new Frame.
5.Before powering on network NIC's VLAN was changed so that all the NIC's use new Frame to upload or connectivity
6.After changing Server was powered on
7. NIC's MAC address for the blade didn't change and all the IP's etc was intact.
8.Blade had a Qlogic MEZ card attached to a MDS Fiber switch and WWW N's was intact when we moved to new Frame and no re-zoning was required.
9.Post validation was done.

Hopefully this helps someone and until next one you all have a good day!!!