Good day All,
Welcome back!!!
Just to recap in part 1 of this series we created a 2 Node Windows 2012 R2 cluster with Scale out File Server.
In Lab the share Name is : \\foosharevm\VMSHARES
Today we will go over creating a two Node Windows 2012 R2 Hyper V cluster, create couple of Virtual Machines and we will place them on the above share.
Step by Step creating Cluster i have added on Part1 so will not do the same here, i will do the cluster creation on the background and during the adding of Hyper V role will go over step by step.
Lab:
Hyper V Cluster:
Hyperv2012A - 192.168.1.25
Hyperv2012B - 192.168.1.26
Hypervclus - 192.1681.24 - Cluster Client Access point.
Enabled Roles and Feature on both Nodes
Failover Clustering
Hyper V
Cluster validation report:

Why am i seeing warnings
1. No SAN storage attached as i want to store all the VM on share location
2. As i have only 1 NIC for all communication
3.My 2 desktops in lab are 2 different versions of Intel processor model, so warning saying Live Migration will not work.. but as along as its not like Intel to AMD migration it will just work fine.
As this is just a lab i skipped all the warnings and went ahead with Cluster creation

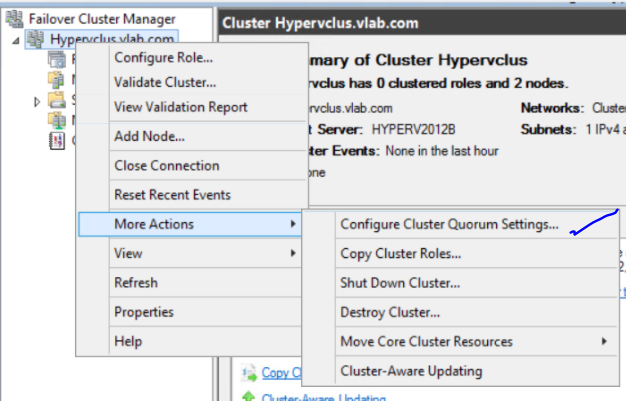
As i told before i don't have SAN storage attached to it so for Quorum formation it automatically configured as Node Majority.
We don't want to leave the Cluster on Node Majority because if 1 Node goes down the whole cluster will go down, so let configure Share Witness on Scale Out File Server
More info on right way of setting up the file share for Witness :
https://blogs.msdn.microsoft.com/clustering/2014/03/31/configuring-a-file-share-witness-on-a-scale-out-file-server/


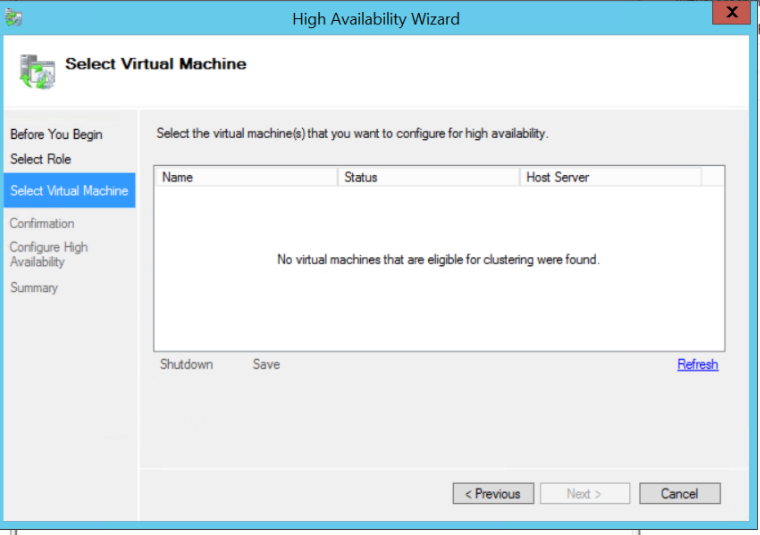
We have successfully created the cluster, so lets add the Hyper V Role in Cluster


As there are no Virtual machines on either of the Nodes that needs to be made as High Available i really don't need to run the Configure Role wizard as we have already enabled Hyper V Role on both the Nodes.So cancel the wizard.
Let's create our First VM on the File Share:

Select the Node you want to have the VM reside and click OK

Important Step is to make sure you enable check box and point the Virtual Machine location to Share location.

Virtual disk also should be placed in the shared location

When i clicked Finished , i got this error...

Well the reason i got this error is because the File Share doesn't have permission so go edit the Permission of file share and add the following users and give them Full Control
1. All the Nodes part of Hyper V cluster
2.Hyper V Administrator

After giving permission wait for sometime for permission to take affect and try it...
So i went ahead and add 2 VM's on each Node and tested the Live Migration..

Tested even the quick migration or unexpected shutdown and both VM's state was saved and moved to other Node and restored.

So far, my take is Installing Hyper V cluster is not that bad experience.. i know if anyone from VMware might struggle but with cost effectiveness and lot of Windows Admins knowledge with Powershell this whole process should be mush easier.
With Nano Servers in 2016 Technical preview and still have some time for Windows 2016 RTM version to come out MS is in right direction and probably lot of Customers may starting looking with Hyper V.
In Next Part i will go over how to migrate the VM from Window 2012 R2 to Windows 2016 TP 4 with No downtime.
Hope this was fun and helps someone!!! until next one all have a good day!!!
Welcome back!!!
Just to recap in part 1 of this series we created a 2 Node Windows 2012 R2 cluster with Scale out File Server.
In Lab the share Name is : \\foosharevm\VMSHARES
Today we will go over creating a two Node Windows 2012 R2 Hyper V cluster, create couple of Virtual Machines and we will place them on the above share.
Step by Step creating Cluster i have added on Part1 so will not do the same here, i will do the cluster creation on the background and during the adding of Hyper V role will go over step by step.
Lab:
Hyper V Cluster:
Hyperv2012A - 192.168.1.25
Hyperv2012B - 192.168.1.26
Hypervclus - 192.1681.24 - Cluster Client Access point.
Enabled Roles and Feature on both Nodes
Failover Clustering
Hyper V
Cluster validation report:

Why am i seeing warnings
1. No SAN storage attached as i want to store all the VM on share location
2. As i have only 1 NIC for all communication
3.My 2 desktops in lab are 2 different versions of Intel processor model, so warning saying Live Migration will not work.. but as along as its not like Intel to AMD migration it will just work fine.
As this is just a lab i skipped all the warnings and went ahead with Cluster creation

As i told before i don't have SAN storage attached to it so for Quorum formation it automatically configured as Node Majority.
We don't want to leave the Cluster on Node Majority because if 1 Node goes down the whole cluster will go down, so let configure Share Witness on Scale Out File Server
More info on right way of setting up the file share for Witness :
https://blogs.msdn.microsoft.com/clustering/2014/03/31/configuring-a-file-share-witness-on-a-scale-out-file-server/


We have successfully created the cluster, so lets add the Hyper V Role in Cluster


As there are no Virtual machines on either of the Nodes that needs to be made as High Available i really don't need to run the Configure Role wizard as we have already enabled Hyper V Role on both the Nodes.So cancel the wizard.
Let's create our First VM on the File Share:

Select the Node you want to have the VM reside and click OK

Important Step is to make sure you enable check box and point the Virtual Machine location to Share location.

Virtual disk also should be placed in the shared location

When i clicked Finished , i got this error...

Well the reason i got this error is because the File Share doesn't have permission so go edit the Permission of file share and add the following users and give them Full Control
1. All the Nodes part of Hyper V cluster
2.Hyper V Administrator

After giving permission wait for sometime for permission to take affect and try it...
So i went ahead and add 2 VM's on each Node and tested the Live Migration..

Tested even the quick migration or unexpected shutdown and both VM's state was saved and moved to other Node and restored.

So far, my take is Installing Hyper V cluster is not that bad experience.. i know if anyone from VMware might struggle but with cost effectiveness and lot of Windows Admins knowledge with Powershell this whole process should be mush easier.
With Nano Servers in 2016 Technical preview and still have some time for Windows 2016 RTM version to come out MS is in right direction and probably lot of Customers may starting looking with Hyper V.
In Next Part i will go over how to migrate the VM from Window 2012 R2 to Windows 2016 TP 4 with No downtime.
Hope this was fun and helps someone!!! until next one all have a good day!!!
No comments:
Post a Comment