Wednesday, March 21, 2018

My First hand burn in the Cloud

Good day All,

Welcome back!!!!

I planned on doing couple of more series on system admin but unfortunately got sick for couple of days.
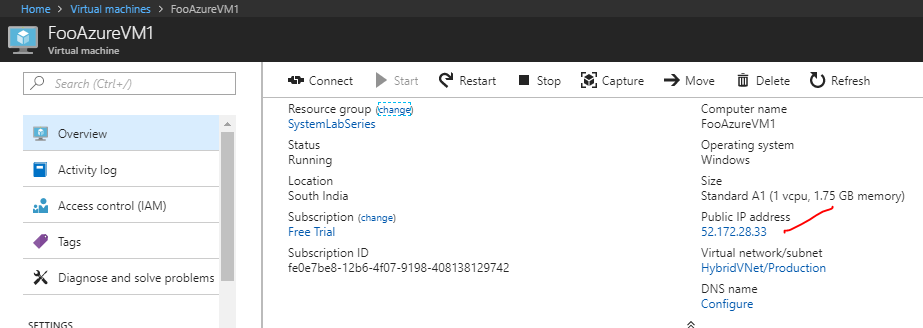
As part of demo i created a 2 Node Availability set with Scale out File Server on Windows Failover cluster with Storage space direct.
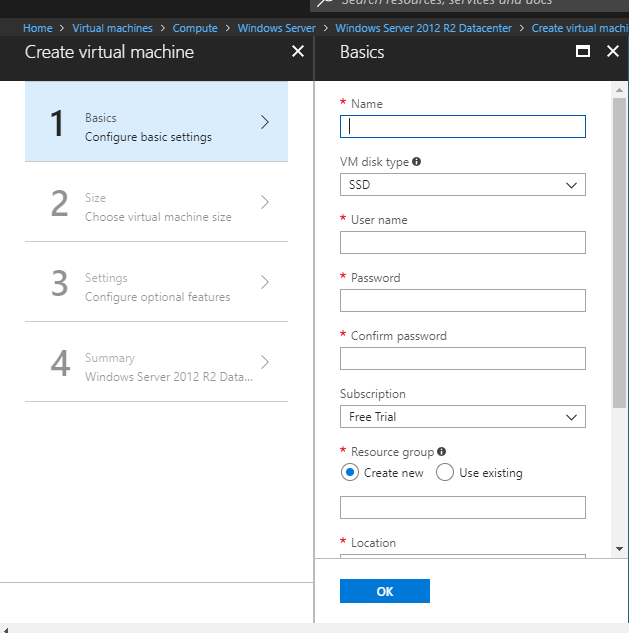
In order to create the demo i created 2 VM's with 2 SSD and was able to complete my demo.
Later that day i stopped all the VM's so that it gets allocated and my free credit was like 100$ left for next 14 days.
Suddenly got sick for couple of days and then i got a notification that my free subscription is disabled.
Went in there to verify what the heck happened and when i saw all my funds was gone and it went with over subscription of the amount so my account my disabled.


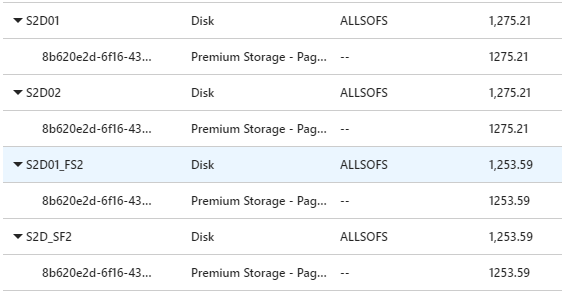
Well before i got sick i did stop the VM's and de-allocated it right? then what happened.. so of my planning screwed because i used 4 SSD which are premium disk for the demo and i forgot to remove them and that burnt all my free fund.


So people out there planning to demo in Azure ensure to save fund after you done playing de-allocate or remove everything no needed and keep as minimal as possible so that you dont end up cost on it.

Trying for another alternative to kick start my demo, so until next one you all have a good day!!!!!!!!!!!!!!!!!!!!!!!


Thursday, March 8, 2018

Resize OS disk or datadisk - Azure SystemAdminLab4

Good day All,

Welcome back!!!

With we system admin so used to expanding or resizing disk on the fly this would be odd to see that you need to shutdown the VM to perform disk expansion in cloud and it needs downtime.

As things changes i think we will these little things getting fixed for now below is the steps and this can be possible on using power shell

One more point is these disk are Managed disk scroll down below steps to do UnManaged disk
Information you need is :

1.Name of the Virtual Machine
2.Resource group name the Virtual Machine is residing


it will ask if you want to use Bash Shell or Powershell , then it will authenticate to you subscription
and something like will open


In the below example i am expanding OS disk from 128 GB to 135 GB


PS Azure:\> $rgName = 'SystemLabSeries'   - Resource Group Name

PS Azure:\> $vmName = 'FooAzureVM1'    - Virtual Machine

PS Azure:\> $vm = Get-AzureRmVM -ResourceGroupName $rgName -Name $vmName

PS Azure:\> Stop-AzureRMVM -ResourceGroupName $rgName -Name $vmName

Virtual machine stopping operation
This cmdlet will stop the specified virtual machine. Do you want to continue?
[Y] Yes  [N] No  [S] Suspend  [?] Help (default is "Y"): y


OperationId :
Status      : Succeeded
StartTime   : 3/8/2018 1:27:33 PM
EndTime     : 3/8/2018 1:29:44 PM
Error       :

PS Azure:\> $disk= Get-AzureRmDisk -ResourceGroupName $rgName -DiskName $vm.StorageProfile.OsDisk.Name

PS Azure:\> $disk.DiskSizeGB = 135

PS Azure:\> Update-AzureRmDisk -ResourceGroupName $rgName -Disk $disk -DiskName $disk.Name


ResourceGroupName  : SystemLabSeries
ManagedBy          : /subscriptions/fe0e7be8-12b6-4f07-9198-408138129742/resourceGroups/SystemLabSeries/providers/Microsoft.Compute/virtualMachines/FooAzureVM1
Sku                : Microsoft.Azure.Management.Compute.Models.DiskSku
Zones              :
TimeCreated        : 3/7/2018 6:47:11 AM
OsType             : Windows
CreationData       : Microsoft.Azure.Management.Compute.Models.CreationData
DiskSizeGB         : 135
EncryptionSettings :
ProvisioningState  : Succeeded
Id                 : /subscriptions/fe0e7be8-12b6-4f07-9198-408138129742/resourceGroups/SystemLabSeries/providers/Microsoft.Compute/disks/FooAzureVM1_Os Disk_1_80ff944c93b34895a4d67caa2b014c52

Name               : FooAzureVM1_OsDisk_1_80ff944c93b34895a4d67caa2b014c52
Type               : Microsoft.Compute/disks
Location           : southindia
Tags               : {}


PS Azure:\> Start-AzureRmVM -ResourceGroupName $rgName -Name $vmName


OperationId :
Status      : Succeeded
StartTime   : 3/8/2018 1:37:59 PM
EndTime     : 3/8/2018 1:39:51 PM
Error       :

If you see below successfully expanded the drivers.


So if you have to do this example of a datadisk then steps are same just the below changes, you need to mention Data Disks[0] , 1 2 etc..

$disk= Get-AzureRmDisk -ResourceGroupName $rgName -DiskName $vm.StorageProfile.DataDisks[0].Name


UnManaged disk:

Steps pretty much the same for OS disk

$rgName = 'my-resource-group-name' $vmName = 'my-vm-name' $vm = Get-AzureRmVM -ResourceGroupName $rgName -Name $vmName Stop-AzureRmVM -ResourceGroupName $rgName -Name $vmName $vm.StorageProfile.OSDisk.DiskSizeGB = 1023 Update-AzureRmVM -ResourceGroupName $rgName -VM $vm Start-AzureRmVM -ResourceGroupName $rgName -Name $vmName

Un Managed datadisk : you just change from OSDisk to DataDisk[0]

$vm.StorageProfile.DataDisks[0].DiskSizeGB = 1023

We come to end of this one, until next one you all have a good day!!!!!!!!!!!!!!!!!!!!!!!!!!!!!!!!!!!

Wednesday, March 7, 2018

Un-assign a Pubic IP for a Virtual Machine - Azure SystemAdminLab3

Good day All,

Welcome back!!!

As we know in cloud everything cost you money and when recreating VM's you should try to avoid assign Public IP for some reason you have done and how to deallocate.

Note: best practice is to create a Public Jump Server in same Subnet make sure Proper Access and security is applied on it .So any new Server build or to access the Server you login to JumpServer and from there internally you can go as by default all VM's in the VNet should be able to access.

If you see below my VM FooAzureVM1 has a public IP


De-allocating the public IP:

Couple of ways to do it, so what i doing is going through Resource group


Click on the Network Interface Name and then click dissociate and click Yes


After its done then you will see something like this Public IP is gone


 If
If for some troubleshooting reason you need to get back public IP you will come to same place and this time click on Associate and it will generate a Public IP.


come to end of this one Until next one you all have a good day!!!!!!!!!!!!!!!!!!!!!!!!!!!!!!!!!!!!

Adding the VM to domain - Azure SystemAdminLab2

Good day All,

Welcome back!!!

In the part 2 of the series will go over how to add the new Virtual Machine to existing domain

Azure AD   :     FOOAZUREAD       IP:10.1.0.4
On-premises:     ONPREMFOODC   IP:10.92.76.10


Note: We usually change IP,DNS etc in the host Virtual Machine in Azure VM we dont do anything inside Virtual Machine we will have to do it Portal or Powershell.

1. Assign a Static IP to Virtual Machine , the reason is because if you reboot Virtual machine in Azure it may loose the IP and a new IP will be assigned. In my case i am assigning it as 10.1.0.6


click and and you are done.

2. Change the DNS Servers IP of the Virtual Machine

Go to Network adapter resource and click on DNS Server and add the DNS IP

I added 10.1.0.4 for Azure AD and 10.92.76.10 my on premise AD


3. Ping the local AD Server


4. Add the VM to domain


5. Adding to domain error


i was unable to add to domain and it was failing with error code 1332.
If you see above i was able to ping Azure AD but still  had issues

So started to verify DNS and it was working fine too.. then after sometime i realized something
anyone any guess what was the solution?????????????????????????

I had 2 AD 1 in On premise and the Other in Azure right? all my FSMO roles are running on the On premise AD Server and for some reason by site to site VPN got disconnected and it was not able to locate the AD and it was failing.

As soon as i fixed my site to site connection then i was able to add to domain.


Next in the series i will go about how to de-allocate a Public IP in case you have requested it during VM creation...

Hope this helps someone until next one you all have a good day!!!!!!!!!!!!!!!!!!!!!!!!!!!!!!!!!!!!!!


Tuesday, March 6, 2018

Creating a Virtual Machine - Azure SystemAdminLab1

Good day All,

Welcome back!!! As a system admin wanted to try all the things i do on-premise see how to achieve it Azure , so named this Series as SysadminLab

So First article will go over create a Virtual Machine see what are is required .

Note as a Windows guy i like GUI so will try to stick with that if needed only will use Powershell.


Pre- requesties you will need before you think to create a VM:


1. Resource Group
2. Storage Account
3.Subscription details
4.Virtual Network
5.Subnet
6.Public IP if required access over internet
7.Network Security Group
8. Availability Set


Must be wondering WOW so much , as for starts Resource Group Name, Subscription,Virtual Network, Subnet is what needed like Storage Account you can auto create same is the case for Network Security Group and Availability Set.
There are 2 ways to do it, either create all these things ahead of time and then pick from drop down menu or during the Virtual machine creation you get the option to Auto create and you can do so.

As part of the connecting Azure to On Premise i already created a Virtual Network 10.1.0.0/16 and created a Production Subnet as 10.1.0.0/24 so will not show how to do you can refer this link 


Under basics give the details and click ok


 Select a Compute Size and you see how much it cost Per-Month so Select


 Under settings , for now i am creating High Availability. Note if you have any plans to do it it should be done only when you creating a Virtual machine. For now there is no option to add  existing Virtual Machine to a Availability Group

We have Power shell command we will use that will create the VM by deleting existing VM in Availability group in this SystemAdmin Series.

For Storage we are picking Managed disk, which means disk will be managed by Azure and they give 99.95 SLA on it. If you need more than that then they have other Storage redundancy available that we will discuss later or just google on it.


 When you click Network and Virtual Network you have the option to create new Network or use the existing one, so i picked already the existing one .If you need to refer see above in the article gave a link to that.


As i already had a Production Subnet 10.1.0.0 so when VM is created it will autopick a IP in the range and gets assigned unless you go in and change the IP to Static.
Public IP Resource is auto created for you or if you have existing IP you can use.
Network Security Group which is like a Firewall is auto created with Port 3389 Opened
Rest of the details i picked default and click ok


So VM with Windows 2012 R2 is deployed.

Lets check couple of things

1. Virtual Machine Status


2.  How to RDP to the Server from Internet

Click on the VM FooAzureVM1 and click connect to download a RDP file to connect.


Open the RDP file and Will show the Public IP it is connecting to


3. Verifying the Server name and IP (DHCP gave a IP from the Production Subnet)


4. So how was RDP traffic enabled by default?

So it auto created Network interface called Fooazurevm1496 assigned a IP of 10.1.0.6
Auto created Network resource group name as FooAzureVM1-nsg and added a inbound rule to allow port 3389 from internet


So its advice able that you create a Virtual Machine name it as Jump Server and assign Public IP only to that and any machine you create in that Subnet don't assign any Public IP as part of security so that no one from cloud tries to access it,

Also the VM acting a Jump Server you you will add a rule such that only certain Subnet and only certain group will be able to RDP etc.. should be done as part of securing the Server.

Next in the System Admin Lab series would be to assign the Virtual machine to existing Active directory so until next one you all have good day!!!!!!!!!!!!!!!!!!!!!!!!!!!!!!!!!!!!