Saturday, January 30, 2016

2 Nodes Windows 2012 R2 Cluster - Scale Out File Server for storing Hyper V Virtual Machines - Part 1


Good day All,

Welcome back!!!

Today topic will go over how to setup a 2 Node Window 2012 R2 cluster, enabling Scale out File Server feature so that you can store Virtual machines on this location a new feature from Microsoft starting with Windows 2012.

The reason i am setting this up is in next article i will go over setting up a Hyper V cluster and store all the VM's in this File out cluster so that you will know how resilient SMB3.0 technology and with hard drive prices dropping you will see lot of customers going in for SATA local attached disk and still get the resiliency and throughput of SAN infrastructure with just 1/4th the price.


Lab:
DC:
Foodc - 192.168.1.20 Domain Controller\ iSCSI Target Server.

File Share Cluster:

FooFS1 - 192.168.1.27
FooFS2 - 192.168.1.28

FooFS - 192.168.1.29 - Client Access Point for Accessing the cluster.
FooSHAREvm - client Access Point for Scale out File Server.


Private IP: 10.0.0.1
Private IP: 10.0.0.2


If you see below, i have present the iSCSI storage to my 2 Clusters FooFs1,FooFs2 and both able to see the 3 LUN's

945MB Lun will be used for Quorum
99GB Luns will be used for storing Virtual Machines.


Common Mistakes i have seen people doing:

1. Not disabling IP6 address if not used both for Prod/Heartbeat NIC
2.Not changing the binding order and keeping heartbeat NIC as Primary
3. Forgetting to un-check register this connection address in DNS for Heartbeat NIC


4. Forgetting to disable NETBIOS over TCP/IP for Heartbeat NIC


5. Making sure same duplex settings are same for Prod and Heartbeat Nic's.
6. Teaming is now possible so if the Server is more critical should plan for it.
7. Firmware applied and same on all clusters.
8, Making sure that all Nodes in cluster are in the same Build version, Patch Level,Roles and features,Firewall,Bit locker..etc i mean should be almost identical.
9. Initializing the LUN's and formatting the LUN's on all the Nodes.
10.Not checking if LUN's are visible on all the Nodes.
11, Not checking if you able to Ping all the Nodes in the cluster.

if you avoid doing common mistakes i have seen more robust Clusters which perform well and run for very long time with no issues.

Big question when do i initialize and format disk? should i need to do on all the Nodes? or any particular Node? drive letter assigning etc..

I have followed these steps always

1. Make sure you can see the disk on all the Nodes
2. Identify any particular Server has Primary Server for example i am taking FooFS1 as my primary Server.
3. Open disk management , right click on all the disk and bring it online and initialize all the disk as MBR or GPT depending on your requirement.

4. Format the disk's and during format don't assign any drive letters if you need to add the LUN's to Cluster share volume, just format it.
the one with 945MB i have assigned the drive letter as Q for quorum.


5.Now right click all the disk and take them offline. This is Optional step but i always prefer to add the disk to cluster and then assign a drive letter.


If you don't format your disk but just run Cluster Validation you will see this below error


Cluster Validation what is it and Why?

Well the common mistakes i listed out Microsoft thought the same so to make sure person creating the Cluster miss anything so they came up with this great idea of Cluster Validation.

It is very very important that if you ever want to build a Cluster this Validation should be your first step.
I listed common mistakes because you can do that so that when you come and run the Validation you will see lot of green check marks and not yellow warnings.

Lets run the Cluster validation for the Cluster:


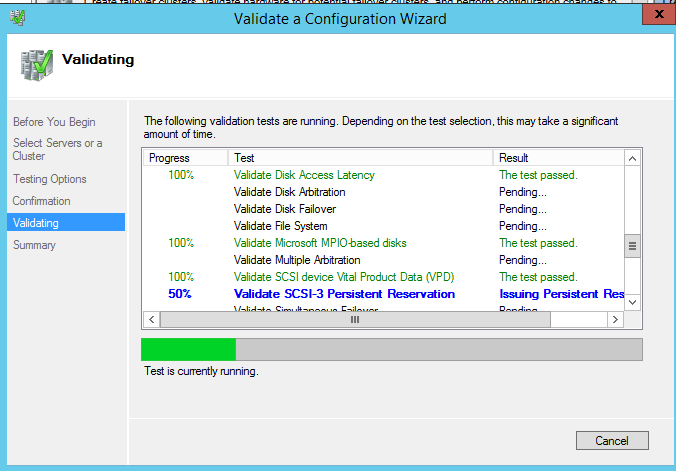
Always a good thing to uncheck creating cluster wizard and make sure to review the report..

you got to make sure everything is green.. if not go back fix the ones which are marked in yellow and re-run the validation


Reason for my warning is i have Windows Firewall disabled on all the Nodes.


Now if you satisfied and all ok to proceed then its time to create your Cluster

Days of Windows NT/2000/2003 are gone where you need to follow so many steps before you start thinking of creating clusters.. MS has come a long way,,,,,


1. If you have unchecked create cluster in validation and need to start to create cluster this is where you click it.. both ways go to the same Wizard


2.

Add all the Nodes for cluster and click Next

3. Access point is the way you want to access the cluster, so give a name and a unique IP Address


if you want to add all the disk to Cluster just leave the check box and click Next.


4. ola!!! you just created your Cluster, that was easy!!!


5. Click View Report, you will see that it has automatically selected the best position of Node and disk Majority for Quorum and the disk with least Size was picked for it.

Note: Depending on Number of Nodes in the cluster this setting will change automatically.. if you add a third Node to this cluster then the Quorum Setting will change as Node majority automatically..
Will do a post on it by adding one more Node to this cluster to test it what happens.


Click Finish


If you want to change the quorum settings you can do that by clicking Configure Cluster Quorum Wizard.

Note: What is quorum and why do you need this is beyond this article that is a very huge topic and i believe MS as so many great article on it which goes all the features so if need to know more go spend some time on it.

Note: If you want to create a 2 Node SQL or exchange cluster then Wintel steps should end here and we need to handover the Servers to respective teams.

Always make sure after creating cluster go and modify the network properties if required which Network will use for Cluster communication only and which one for both Client and Cluster


So Cluster is done and now this Steps are only if you want to enable or create File share to store either Virtual machines or SQL database.

1.


2. if you see the below error it means that you have not added the File Server Role on the Nodes, so just add them and re-run it again.


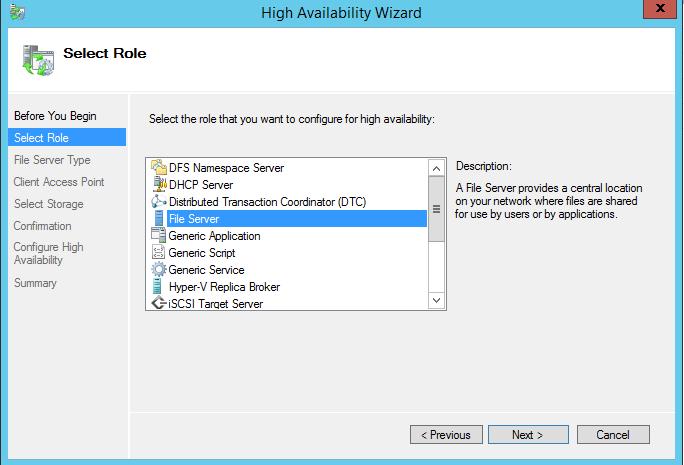
3. As this is not going to be used for traditional File Server we need to select
Scale- Out File Sever for Application data, and click next


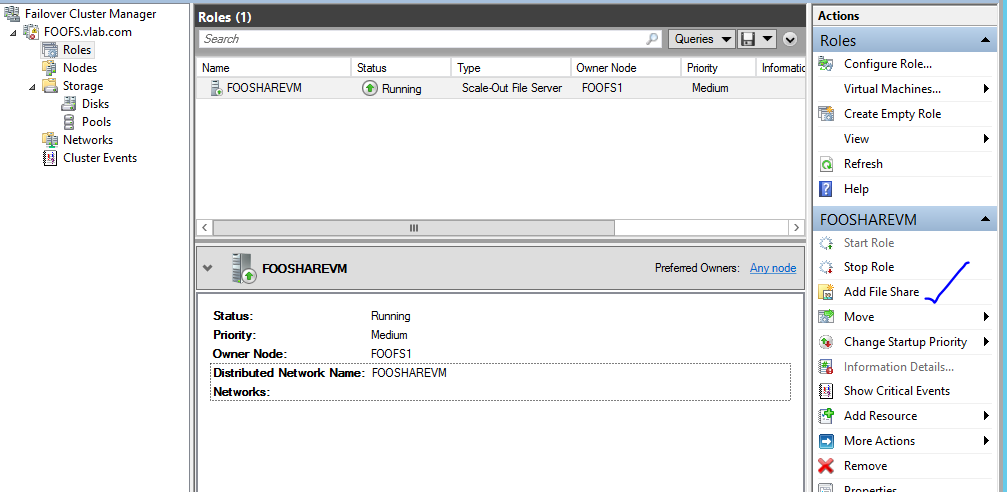
4. provide a name which will be used in order to access this share, in my example i have given as
FOOSHAREVM


5. that was easy


Now we need to add Storage to Cluster Shared Volume so that we can create the shares


So i have added 2, 99 GB disk to Cluster Share Volume


if you now go and see under c:\clusterstorage\  you will see 2 disk are added in there...


Note: if you don't know what is Cluster shared volume, i know recommended you read first but if you are a VMware guy then this is similar to like datastore how all the Nodes in the cluster access the data simultaneously.


We are almost done and the last Step is to create shares so that we can store our VM for my Part 2 of this testing

Click Add share


Pick a volume where you want to create the share.. lets Pick Volume 1
Just gave a name as VMSHARE and click Next


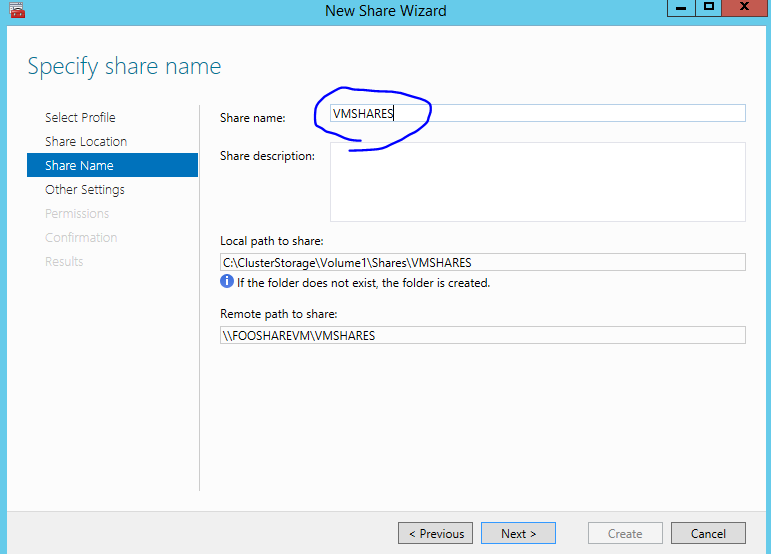
leave the default and click next


leave the permission to default and click next and click create the share.


if you click on shares you will see the new created share.


that's it.. now you can test the share...

Give couple of mints for DNS to sync and test it.. I tested the share from my DC


if anyhow curious how DNS looks and AD look this is how


Now big question every one having is why do we need to Scale out File Server . why cant we just not use a traditional 2 Node cluster, add Luns to it and enable Hyper v on it and just use it

well true we can do that too but because of the couple of reason i know this is useful

1. MS is pushing everyone to use JBOD(just a bunch of disk) like a scsi storage and use SMB 3.0 technology with no downtime you can move VM's across . With this what do you save, well small companies this is very good options for high availability with No SAN at all and larger companies instead of spending lot of money on traditional SAN you can get 10 GB card attach to these Nodes and you can get a greater throughput as traditional SAN
All major hardware vendors started to have Severs called cluster in a box with all the storage and Nodes of cluster attached together.

2. MS with Windows 2016 introduced Nano Servers with just about 450 MB OS which is kind of equivalent to ESXi
So what you can do is create Hyper V cluster on Nano Servers and for VM storage use Scale out File Servers.

Finally we come to a end, hopefully this helps someone!!!!
In the Part 2 of this series i will configure a 2 node Windows 2012 R2 Hyper v and instead of Local storage we will use Scale out File Sever.

Till Next one you all have good day!!!!

Friday, January 29, 2016

Nested Virtualization in Hyper V - Windows 2016

Good day All,

Welcome back!!!

Nested Virtualization on Esxi\VMware workstation was possible with some tweaking that really helped test some scenarios.With new Version of Hyperv in Window 10\Windows 2016 this is possible out of the box just by running a power shell script.

So what is it? well lets say you have Hyper V on a physical Sever, you create a VM and then you want to have Hyper v installed on the VM, before Windows 10\Windows 2016 is not possible, please see the below error you will get if you enable Hyper V


Microsoft Technet site has excellent article on how to enable Nested feature on a VM with Powershell scripts out there.The beauty is that you run the powershell script and it will do the magic for you instead of earlier there was 2 scripts you will need to download and run the script manually.

Before you start the steps make sure the Host you want to have Nested feature enable has the feature to access internet if not you will have to manually do it.

Please note that this can be possible only on Windows 10 or Windows 2016 Technical preview version with build 10565 and above and there are certain checks you need to verify before this is possible, check the below article which talks about everything.

http://blogs.technet.com/b/virtualization/archive/2015/10/13/windows-insider-preview-nested-virtualization.aspx

1. Open powershell window as Administrative Mode.
2. Set-executionpolicy unrestricted - this will all all scripts to run so just be catious
3. run the below command
Invoke-WebRequest https://raw.githubusercontent.com/Microsoft/Virtualization-Documentation/master/hyperv-tools/Nested/Enable-NestedVm.ps1 -OutFile ~/Enable-NestedVm.ps1 hit enter
4. ~/Enable-NestedVm.ps1 -VmName (Name of the VM which needs Nested Feature)

In my example below you will see that i am enabling this feature on a VM called "NestedHyperv"


MAC spooking is not enabled you guest VM will not have any network so say Yes.


Dynamic Memory should be disable before you run the script, if not it disables it for you.


Now if I got try enable Hyper V, booms it works..


Well that was easy .. now we really can test all the features of Hyper v if you have enough memory to play with it in a LAB.

If anyone curious to find out how did i test, i have a Window 10 Professional laptop with latest build version


Hope these steps help some one!!! till next one all have a good day!!!

Wednesday, January 27, 2016

Citrix Database move from SQL 2005 cluster to Standalone VM Server - XENAPP 6

Good day All,

Welcome back!!!

I wanted to do this a quick post before i jump on playing clusters.Recently we moved Citrix database from 2 Node Window 2008 SQL 2005 cluster to Windows 2008 Standalone SQL, here are the steps we did

As this is Production Server we kind of split the cut over to 2 weekends

1st Weekend : Test Database in Xenapp 6 Farm
2nd Weekend Production Database in same Xenapp 6 Farm

Below are the steps:

First Weekend Test Database cut over:

Wintel Steps:

1. Took the IP details of Passive Node
2. Removed the Passive Node from cluster
3. UN-joined the Server from domain and Shut it down.
4.Rebuild a new VM Windows 2008 R2 and installed SQL 2005
5.Stopped all  IMA Service on all Citrix Servers so that no will access database
6.Took a Full database backup
7.Restored on the new Standalone Server
8.Tested ODBC connection from Citrix data collector Server and made sure Citrix Service account is able to access the database.

Citrix Steps:

1.Backup DSN file "MF20.dsn" in Data collector
2.Stop IMA service
3.Rename existing "MF20.dsn" to "MF20_old.dsn"
4.Create a new DSN file pointing to new Standalone Server with respective database
5.Configure Datastore by running the command
dsmaint config /user:Citrix Service account /pwd:XXXX /dsn:"c:\Citrix\IndependentManagementArchitecture\MF20.dsn"

6. Recreate local host by running the command "DSmaint recreatelhc"
7.Start IMA Service
8. Run qfarm and check everything fine
9. Copy the newly created dsn file to all other citrix servers and replace the existing DSN files and rename existing one as old.
10.Stop IMA Service and run the dsmaint config as above on all the applications Servers which are accessing the test database.
11.Post checks on all Citrix Servers

Second Weekend Prod Database:

Wintel Steps:
1. Request Citrix team to stop IMA Service so that no one access the database
2.SQL team took a complete Database backup on the current Active Single Node Cluster.
3.Copied over database to Standalone Server and shutdown the Active Cluster Server
5. SQL team restored the Prod database


Citrix Steps:

Same as above on all Citrix Servers pointing to Prod Database.


After every thing was tested, we cleanup the Single Node cluster by un-join from domain and shut it down.

Special thanks to my Colleague karthik, part of Citrix team for the steps.


Hope this helps someone!!! Until next one you all have a good day!!!!

Monday, January 25, 2016

MY LAB on Hyper V

Good day All,

Welcome back!!! 

With Windows 2016 , i think Microsoft is bridging the gap with VMware so you will see lot of customers moving to Hyper V.

Before i proceed with creating a 2 Node 2012 R2 cluster in my case is on a Hyper V host  just wanted to share with you all how i setup my LAB.Kindly note this is not going to be training session for Hyper v, all i am going to show is with limited resource available like a i5 desktop and laptop you can create clustering\Hyper V labs and play with it.

As i told before i have 2 desktops 8 GB each  running Windows 2008 along with a Laptop Windows 10 of 16 GB ram .

Below is just a example of My LAB:

Domain Name: vlab
IP Address Range: 192.168.1.33 - 192.168.1.199

DC:
foodc - 192.168.1.20 Windows 2012 R2


Hyper V Cluster:

Hyperv2012A - 192.168.1.25
Hyperv2012B - 192.168.1.26

FileShare Cluster:

FooFS1 - 192.168.1.27
FooFS2 - 192.168.1.28

Private IP: 10.0.0.1
Private IP: 10.0.0.2


1. Before you even start, you will have to assess how much memory you have on the host and how you want to allocate memory for each VM's

Windows 2008 R2 came with the dynamic memory option and with 2012 using VM creation by default dynamic memory is selected .VMware guys may say as ballooning but it is technically not.

If anyone wants to know more about dynamic memory please google it :)


2. Coming up with IP Range for your LAB is very important.

 3.. disable Password policy in Domain Policy- Why? because you don't want to have complex password for users in the LAB and also don't like to keep resetting password every 30 days, that's why :)


4. Before you make the VM as Domain controller i have seen lot of people not setting there TCP/IP properties well.. make sure this is some this like below.. DNS  can be either IP of the host or Local host IP and if IP6 not required just disable them.

Also most important thing is what is the domain name you want to use so make a note of it before you install the Domain Service Role.


Making this as Domain controller is just by adding the below role and if this is the first Domain controller then during installation this will check if DNS is available and if not it will install it for you.


5. Differcing Disk:  Lot of guys don't know this option but this is one of the best option to save you disk space , let me show you how?

a. Create a template VM, you can use either fixed disk or preferable dynamically expanding disk so  the drive increases as it grow.
With 2012, VHDX is out there and 2016 VHDX format of disk is preferred way of creating the disk , it has lot of advantages so i will let you guys google on it.


if you see the disk size its only 9 GB.


b. After Setting your Template VM boot with OS either 2008/2012/2016 and disable if required Firewall, UAC ,IPv6 and then run Sysprep as below and shut it down.


c.  Now create your VM's in my example i am creating 2 VM's for my Cluster. So create a VM but at the step to add disk just say Attach a Virtual hard disk later and finish the VM creation as below.


Now lets create a HardDisk and attach to VM. 


The beauty with the above option is it only records the changes and refer to base Template Image for rest of the details.


We are pointing the source disk at the VHD or VHDX we created as part of Template, ran Sysprep and shutdown right?

Now lets attach the disk to VM, that is in my example FOOFS1.
Just click browse , point to the new Hardisk you created and click apply in VM Settings.


After attaching, boot up your VM it will go with OS install as we ran sysprep right and there you go brand new OS install done.

Lets see how much is the disk size???? only 1.5 GB so the same way you can create Multiple copies of OS you want and take advantage of Differencing disk.


6. Boot Through VHD\VHDX:

This is a great way of testing your new OS, you may say how?????

As i said, i have 2 desktops 8 GB ram running Windows 2008 OS.I wanted to install Windows 2012 or Windows 2016 so what i had to do is try multi boot option , install the OS etc the normal steps.
But with boot from VHD, this is what you will have to do it

1. Create a Virtual Machine with fixed disk lets say either Windows 2012 or Windows 2016

2. After OS install shutdown the VM, except the Virtual disk VHD you can delete the VM configuration files.
3. Create a folder in the existing OS, in my case was Windows 2008. ex d:\2012vhd and copy over the VHD to the folder.
4. Go to disk management and attach the VHD\VHDX pointing to the VHD\VHDX you copied in the folder.


After you click OK , it will assign a drive letter in my case it was F:\


5.Open a CMD prompt with Admin rights and run the below command

bcdboot  <mounted driver letter:>\windows and press enter.


6. Now if you reboot the Sever in my case desktop , you will see multi boot option for Windows 2012,windows 2008 in my example..


this was easy instead of going through pain of installing the whole OS and finding drivers etc for it work properly.

Note: Boot through vhd/vhdx works the same way as normal PC you can install everything and test it.


So my LAB is ready with 2 Hyper V host and 2 VM Host for clustering so next topic would be to start playing on some Hyper V testing and migration to new 2016.

If anyone curious how long it took me to setup my LAB almost 2 days of planning and executing.. well with my daughter around it was not easy :)

Hopefully this may help someone!!! until next one you all have a good day!!!