Good day All,
Welcome back!!!
With Windows 2016 , i think Microsoft is bridging the gap with VMware so you will see lot of customers moving to Hyper V.
Before i proceed with creating a 2 Node 2012 R2 cluster in my case is on a Hyper V host just wanted to share with you all how i setup my LAB.Kindly note this is not going to be training session for Hyper v, all i am going to show is with limited resource available like a i5 desktop and laptop you can create clustering\Hyper V labs and play with it.
As i told before i have 2 desktops 8 GB each running Windows 2008 along with a Laptop Windows 10 of 16 GB ram .
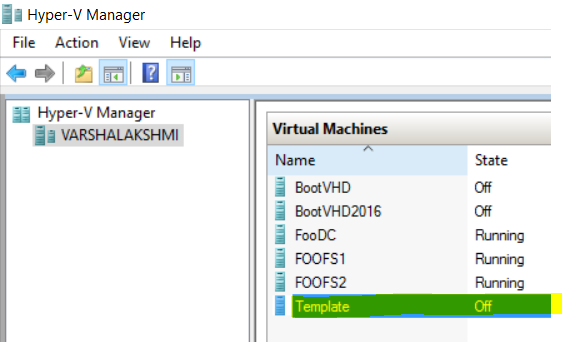
Below is just a example of My LAB:
Domain Name: vlab
IP Address Range: 192.168.1.33 - 192.168.1.199
DC:
foodc - 192.168.1.20 Windows 2012 R2
Hyper V Cluster:
Hyperv2012A - 192.168.1.25
Hyperv2012B - 192.168.1.26
FileShare Cluster:
FooFS1 - 192.168.1.27
FooFS2 - 192.168.1.28
Private IP: 10.0.0.1
Private IP: 10.0.0.2
1. Before you even start, you will have to assess how much memory you have on the host and how you want to allocate memory for each VM's
Windows 2008 R2 came with the dynamic memory option and with 2012 using VM creation by default dynamic memory is selected .VMware guys may say as ballooning but it is technically not.
If anyone wants to know more about dynamic memory please google it :)

2. Coming up with IP Range for your LAB is very important.
3.. disable Password policy in Domain Policy- Why? because you don't want to have complex password for users in the LAB and also don't like to keep resetting password every 30 days, that's why :)
4. Before you make the VM as Domain controller i have seen lot of people not setting there TCP/IP properties well.. make sure this is some this like below.. DNS can be either IP of the host or Local host IP and if IP6 not required just disable them.
Also most important thing is what is the domain name you want to use so make a note of it before you install the Domain Service Role.

Making this as Domain controller is just by adding the below role and if this is the first Domain controller then during installation this will check if DNS is available and if not it will install it for you.

5. Differcing Disk: Lot of guys don't know this option but this is one of the best option to save you disk space , let me show you how?
a. Create a template VM, you can use either fixed disk or preferable dynamically expanding disk so the drive increases as it grow.
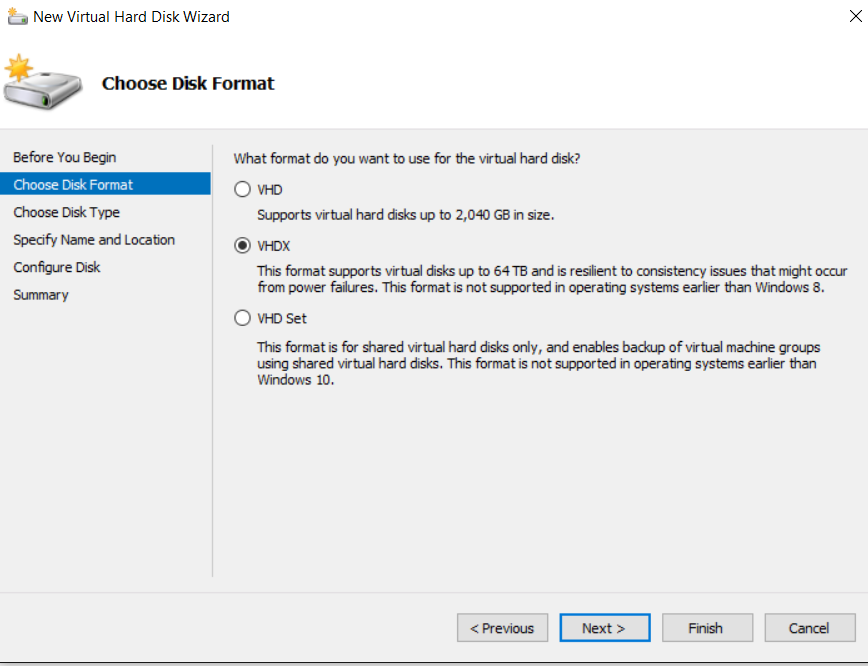
With 2012, VHDX is out there and 2016 VHDX format of disk is preferred way of creating the disk , it has lot of advantages so i will let you guys google on it.


if you see the disk size its only 9 GB.
b. After Setting your Template VM boot with OS either 2008/2012/2016 and disable if required Firewall, UAC ,IPv6 and then run Sysprep as below and shut it down.

c. Now create your VM's in my example i am creating 2 VM's for my Cluster. So create a VM but at the step to add disk just say Attach a Virtual hard disk later and finish the VM creation as below.

Now lets create a HardDisk and attach to VM.


The beauty with the above option is it only records the changes and refer to base Template Image for rest of the details.


We are pointing the source disk at the VHD or VHDX we created as part of Template, ran Sysprep and shutdown right?
Now lets attach the disk to VM, that is in my example FOOFS1.
Just click browse , point to the new Hardisk you created and click apply in VM Settings.

After attaching, boot up your VM it will go with OS install as we ran sysprep right and there you go brand new OS install done.
Lets see how much is the disk size???? only 1.5 GB so the same way you can create Multiple copies of OS you want and take advantage of Differencing disk.

6. Boot Through VHD\VHDX:
This is a great way of testing your new OS, you may say how?????
As i said, i have 2 desktops 8 GB ram running Windows 2008 OS.I wanted to install Windows 2012 or Windows 2016 so what i had to do is try multi boot option , install the OS etc the normal steps.
But with boot from VHD, this is what you will have to do it
1. Create a Virtual Machine with fixed disk lets say either Windows 2012 or Windows 2016
2. After OS install shutdown the VM, except the Virtual disk VHD you can delete the VM configuration files.
3. Create a folder in the existing OS, in my case was Windows 2008. ex d:\2012vhd and copy over the VHD to the folder.
4. Go to disk management and attach the VHD\VHDX pointing to the VHD\VHDX you copied in the folder.


After you click OK , it will assign a drive letter in my case it was F:\


After you click OK , it will assign a drive letter in my case it was F:\
5.Open a CMD prompt with Admin rights and run the below command
bcdboot <mounted driver letter:>\windows and press enter.

6. Now if you reboot the Sever in my case desktop , you will see multi boot option for Windows 2012,windows 2008 in my example..


this was easy instead of going through pain of installing the whole OS and finding drivers etc for it work properly.
Note: Boot through vhd/vhdx works the same way as normal PC you can install everything and test it.
So my LAB is ready with 2 Hyper V host and 2 VM Host for clustering so next topic would be to start playing on some Hyper V testing and migration to new 2016.
If anyone curious how long it took me to setup my LAB almost 2 days of planning and executing.. well with my daughter around it was not easy :)
Hopefully this may help someone!!! until next one you all have a good day!!!
No comments:
Post a Comment